
Help · the whole guide
Tools & Equip Help Guide
Every topic on one page. Updated November 17, 2026. The latest version is always at toolsandequip.com/help. Questions: [email protected].
Start here
01 · Getting started
Set up your company, invite your people and get your tools in, step by step.
What Tools & Equip does
Tools & Equip keeps one list of every tool, machine and piece of equipment your company owns: where it is, who has it, its status and every move. The office uses the website at app.toolsandequip.com. The tool room and the field can also use the iPhone and iPad app to scan labels and move things.
Everyone signs in with their work email and a 6-digit code. There are no passwords. Every plan has unlimited users, so the whole crew can be on it.
Sign up a company
Who can do this Anyone with a work email. The person who creates the company becomes its first admin.
- Go to app.toolsandequip.com/signup, type your work email and press Email me a code.
- Type the 6-digit code from the email and press Sign in.
- Fill in Create your company: the Company name, the Web address (filled in from the name; your labels point at it, so pick one you like), Your name and your Time zone.
- Press Create the company. You land on the Admin page with a welcome note.
The web address can't be changed later: it is printed into every QR label. Use 2 to 41 letters, numbers and dashes. A company is free for up to 50 active tools.
Already have an invite? You don't need to sign up. Just sign in with the email the invite went to.
Roles in a nutshell
Each person who signs in has a role. A role is a set of rights. There are four built-in roles, and your admin can change them or make new ones (see Roles and rights).
| Role | Meant for | Can do by default |
|---|---|---|
| Admin | The owner or office admin | Everything: members, places, categories, adding and removing tools, billing. |
| Crib | Tool-room and shop staff | Move and edit tools, photos, labels, kits, service, work orders, audits, bookings, requests, rentals, stock, jobs and people. |
| PM | Project managers | Look up the whole fleet, book tools, raise requests and rentals, see their own jobs and the tool cost, comment. |
| Field | Foremen and crews | Look tools up, raise requests, comment. |
Invite your people
Who can do this Admin (the Members right).
- Open Admin → Members.
- Type their email under Invite by email, pick a Role (it starts at Field) and press Invite.
- They get an email telling them how to sign in. The invite lasts 30 days. Resend invite renews it.
Already imported your people? On Admin → People you can tick everyone who needs to sign in and press Give app access to N people in one go. See Invite many people at once.
First steps checklist
Do these in order. Each one makes the next easier.
- Categories (for example 45 Pumps, 60 Welders). Tool numbers usually start with the category code. How.
- Locations: your yard, tool crib, shop, trailers and repair vendors.
- People: everyone who can hold a tool, even if they never sign in.
- Jobs, with their PM.
- Tools: add them one at a time, or bring in your spreadsheet with Import. The import can add missing categories and locations for you.
- Invite the team (above).
- Print labels and stick them on. Then anyone can scan a tool with a phone camera. See Labels.
- Optional: add your logo and colors, set service intervals on categories, and choose your notifications.
Find your way around
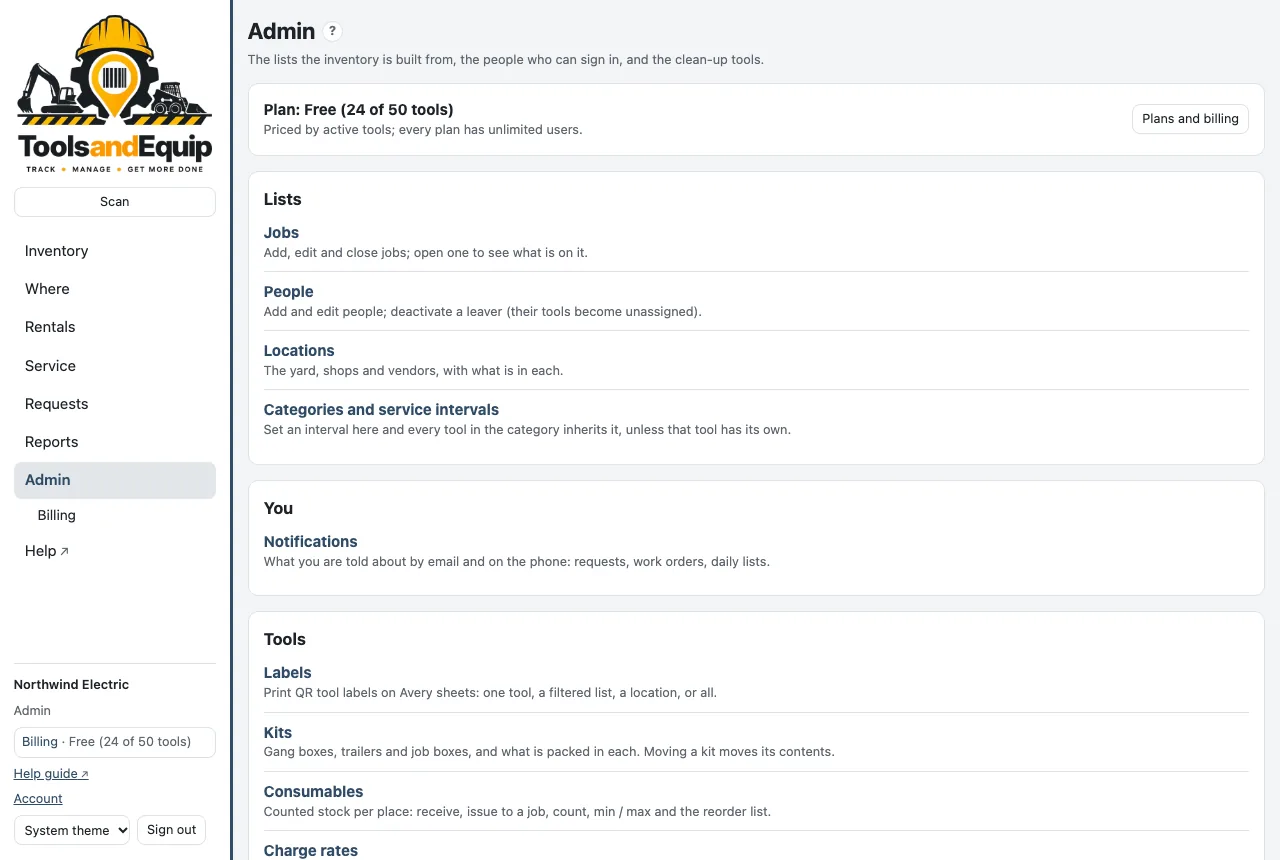
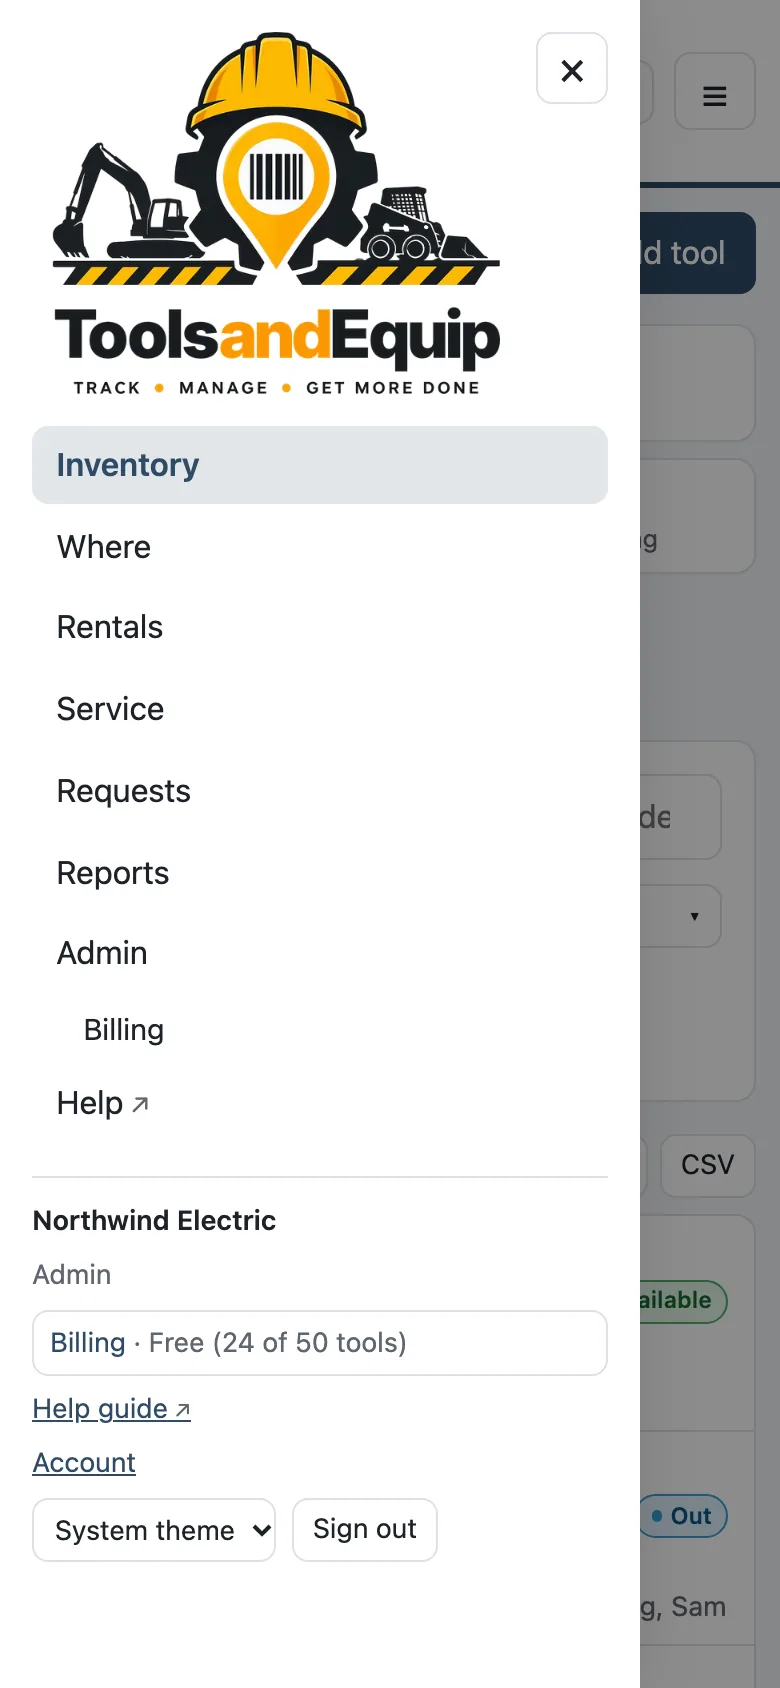
The menu runs down the left side on a computer. On a phone, tap ☰ at the top. It holds Inventory, Where, Rentals, Service, Requests, Reports and Admin. If your role only looks things up, the last item reads Lists. At the bottom of the menu are your company, your role, Help, Account, the light or dark theme and Sign out.
The Scan button at the top uses the camera on phones, tablets and laptops that have one. A small ? next to a page title opens the help for that page.
Start here
02 · Signing in
Your work email and a 6-digit code. No password to remember.
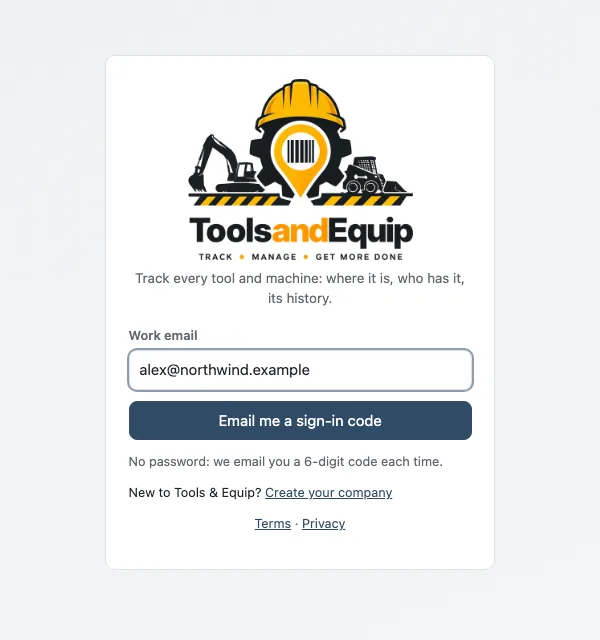
Sign in with an email code
Who can do this Anyone your company has invited, on the website and in the phone app.
- Open app.toolsandequip.com (or the Tools & Equip app).
- Type your Work email and press Email me a sign-in code.
- Open the email from [email protected] and type the 6-digit Code.
- Press Sign in.
Good to know
- No password. We email a fresh code each time you sign in.
- A code works for 15 minutes and only once. If it has run out, press Send a new code and use the newest one.
- Not in your inbox? Check your junk or spam folder for mail from [email protected], wait a minute, then ask for a new code. You can ask again after about a minute.
- Wrong address? Press Use another email.
- You stay signed in on that browser or phone until you press Sign out. You don't need a code every day.
- Invite links: the button in your invite email opens the sign-in page with your email already filled in.
Never share your code with anyone, us included. Support will never ask for it.
Signed in, but "No company yet"
This means nobody has invited that email address yet. Ask your equipment admin to invite the exact address you used, then press Check again. Or press Create your company to start your own company account.
More than one company
If your email belongs to more than one company, pick the company at the bottom of the menu. The phone app has Switch to … buttons in Settings.
Sign out
Open the menu and press Sign out. On a shared computer, always sign out when you're done.
In the phone app, moves made with no signal wait on the phone. Signing out before they are sent loses them, so the app warns you first. Open Waiting to send and send them before you sign out.
Everyday
03 · Inventory
Find any tool fast, filter by category and status, and read a tool's page.
Find a tool
Who can do this Everyone who signs in can look tools up.
Inventory is the first page you see. Type in the search box: a tool number, description, make, model, serial number, place, job or person. Barcode, VIN, plate and category match too. The list updates as you type.
Typing one or two digits (like 45) matches that category code.
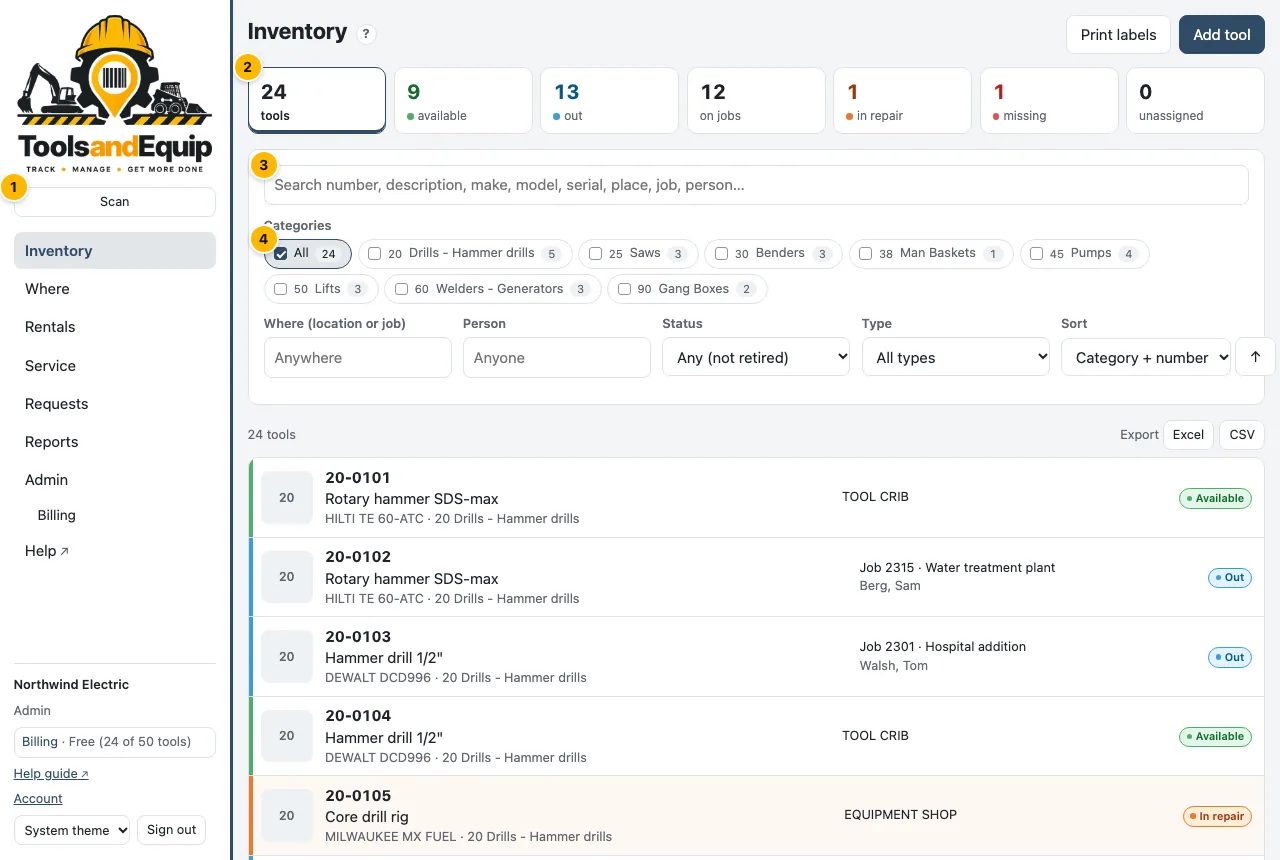
Fastest of all: press Scan at the top and point the camera at the tool's label or barcode. The tool page opens.
Category chips
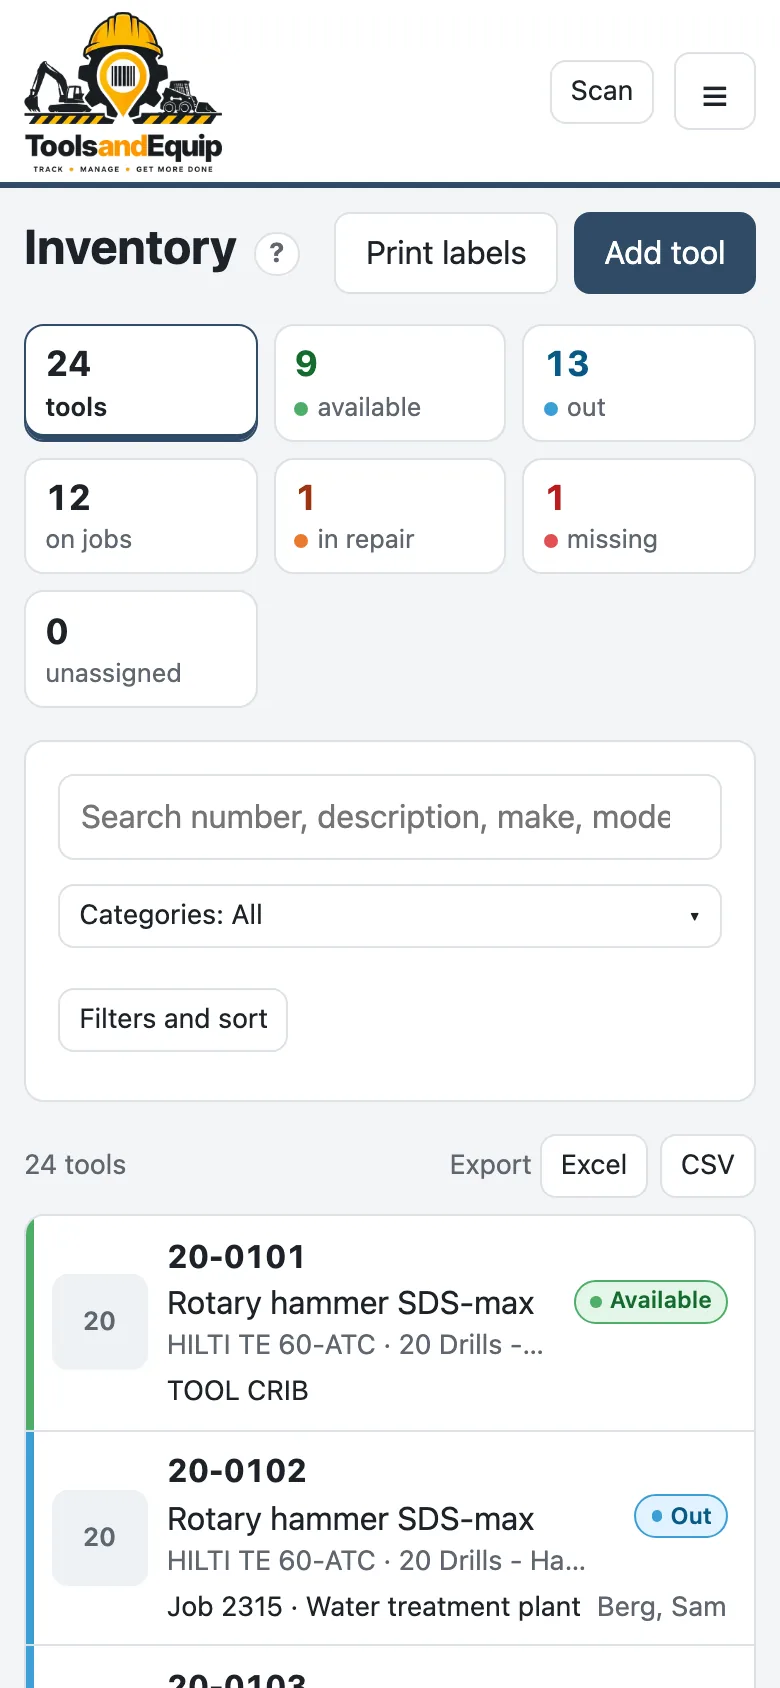
Under Categories there is a chip for each category with its tool count. Click one to show only that category. Click more chips to show several. All clears them. On a phone the chips fold behind a Categories button.
Status tiles and colors
The tiles at the top count the tools: tools, available, out, on jobs, in repair, missing and unassigned. Click a tile to filter by it. Click it again to clear it.
Each status has its own color, on the badge, the stripe down the row and the tool page. The status is always written out too, so you never have to rely on the color.
| Status | Means |
|---|---|
| Available (green) | In a storage place, ready to go. |
| Out (blue) | Checked out to a job or a person. |
| In repair (orange) | Sent for service or repair, or failed an inspection. |
| Missing (red) | Nobody can find it. |
| Unassigned (red) | It was in the name of someone who has left. Find out where it is. |
| Retired (gray) | Sold, scrapped or lost for good. Hidden from the list and the plan count, but its history stays. |
More filters and sorting
Press Filters and sort to filter by Where (location or job), Person, Status and Type (Tool, Equipment, Other), and to sort by number, description, category, status, where, person or last moved. The ↑/↓ button reverses the order. Clear filters starts again.
- To see retired tools, set Status to Retired.
- The filters live in the page address, so you can bookmark a view or send it to someone.
- Export (Excel or CSV) gives exactly what is on screen, every page of it, with the replacement cost totaled.
- A tool booked in the next 60 days has a booked 11/20 tag. Select tools lets you tick several tools, then Add to a request… or Reserve… them together (see Reserve from a tool or the inventory).
The tool page
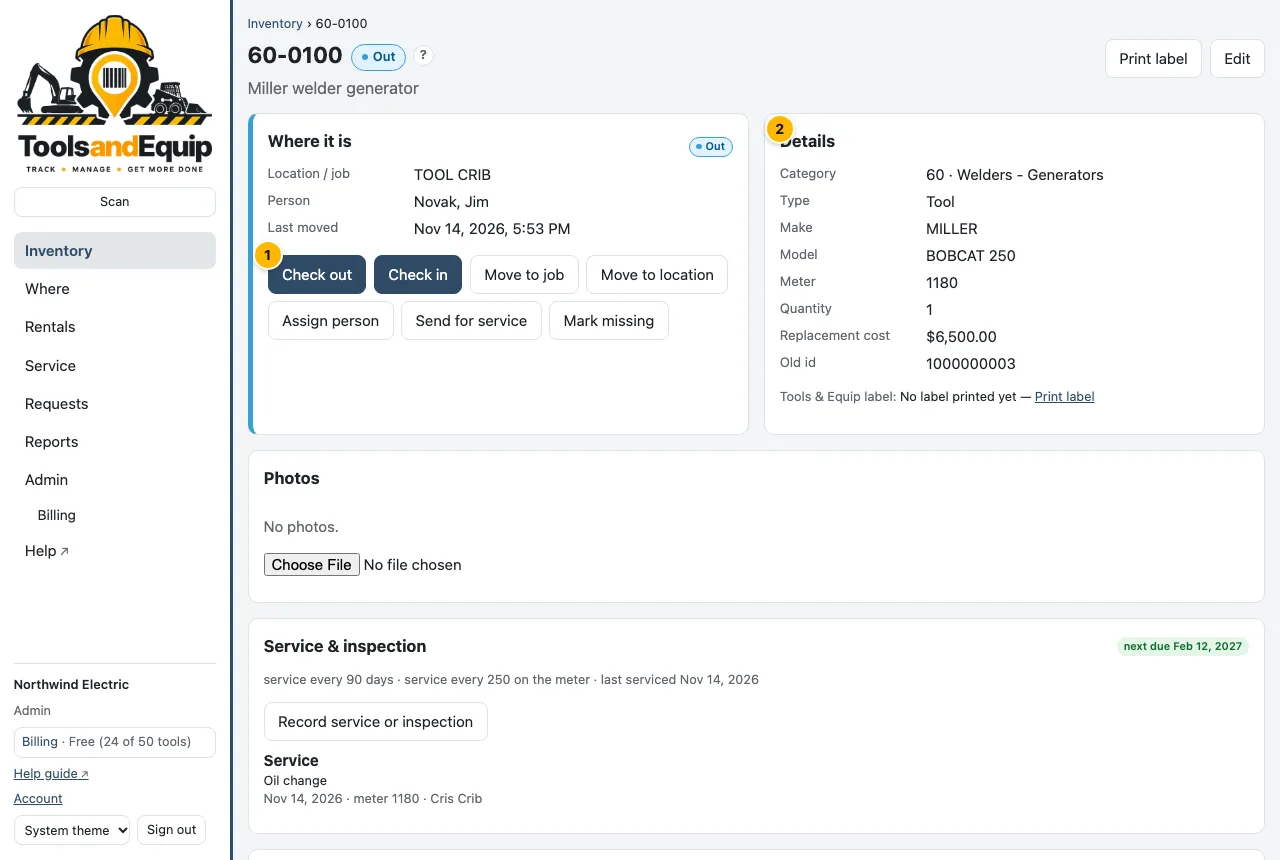
Click a tool to open its page. It shows:
- Where it is: the place or job, the job's PM, the person who has it and when it last moved. The move buttons are here too (see Moving tools), with Reserve… and any bookings in the next 60 days (see See a tool's bookings).
- Details: category, type, make, model, serial, barcode, VIN, plate, meter, quantity, replacement cost, notes, and when its label was printed.
- Photos: its own, or ones shared by every tool of the same make and model. Click a photo to enlarge it.
- Service & inspection, Work orders, Kit and Documents, when your company uses them.
- Comments: notes from anyone, like "cord is nicked".
- History: every move, status change, service and edit, newest first, with who did it. A signature taken on the phone shows as Signed by … with Show signature.
Everyday
04 · Adding and editing tools
Add a tool, scan its barcode or serial, take photos, and keep the details right.
Add a tool
Who can do this Admin (the Add tools right). Bringing in many tools at once is easier with Import.
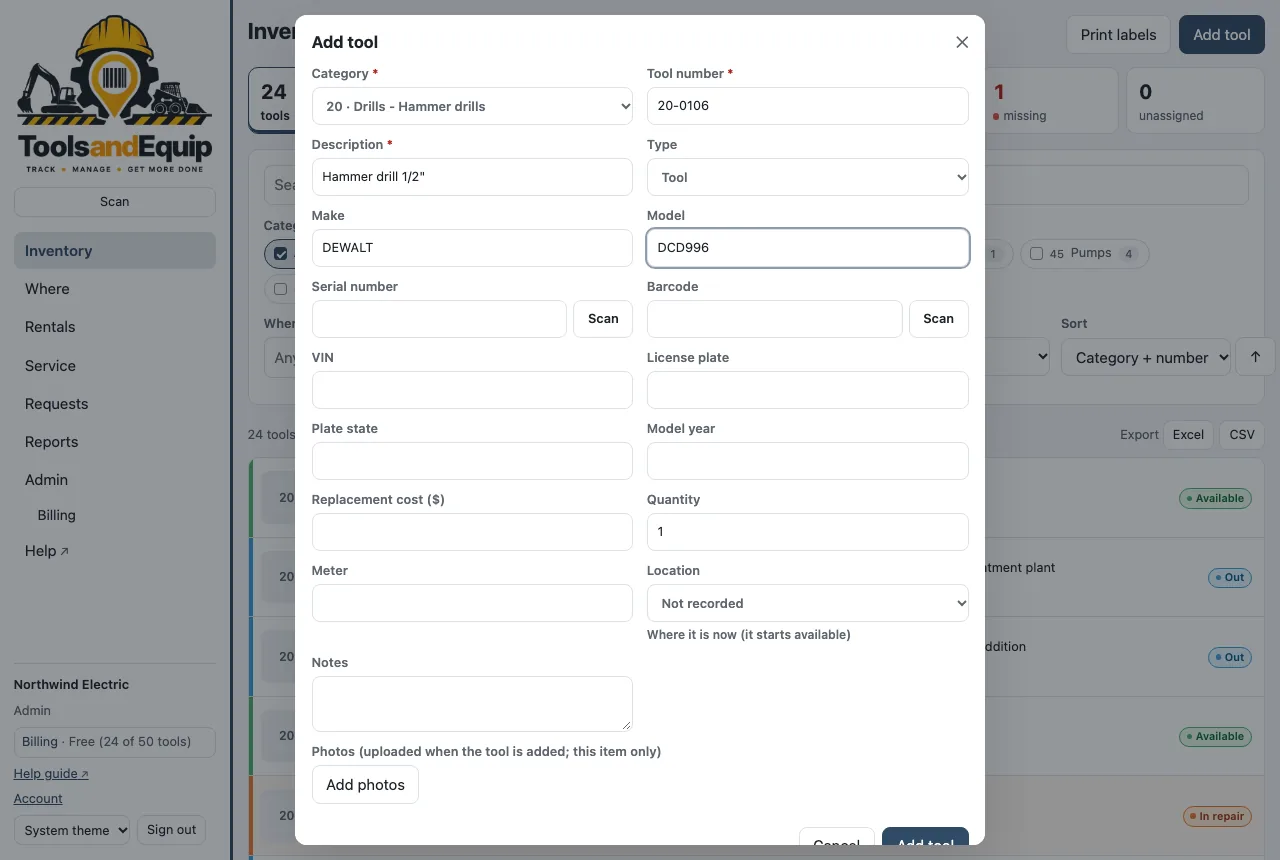
- On Inventory, press Add tool.
- Pick the Category. A Tool number is suggested from the category's next number. Change it if your tag says something else.
- Type a Description (required), then whatever else you know: type, make, model, serial number, barcode, VIN, plate, model year, replacement cost and quantity.
- Set Location (where it is now; it starts as available) and the Meter if it has one.
- Add photos if you like (below), then press Add tool. Its page opens.
Over your plan's tool limit after the grace period? Add tool is paused until the company is back within its plan. Moving and looking up tools keeps working. See Plans and billing.
Scan the barcode or serial
On a phone, tablet or laptop with a camera, a Scan button sits beside Barcode and Serial number. Point it at the maker's barcode or serial sticker. The field fills in and turns highlighted: Scanned: … Save to keep it.
Scanned something unknown with Scan at the top of the page? Admins get Add a tool with this barcode, which opens this form with the barcode filled in.
Tools & Equip label or barcode?
They are two different things:
- The Tools & Equip label is the QR label you print from Labels. It already knows which tool it belongs to. You never type it in anywhere.
- The Barcode field is for a barcode the tool already carries: the maker's, a rental company's or an old asset sticker. Fill it in so that scanning that old sticker finds the tool too.
If you scan a Tools & Equip label into the Barcode field, nothing is entered and the form tells you why, for example That's this tool's Tools & Equip label — it already works. If the label belongs to a different tool, it says which one.
Photos
Who can do this Adding photos on the tool page: Admin and Crib (the Photos right).
- When adding a tool: Take photo or Choose photos on a phone, Add photos on a computer. Up to 8. They upload once the tool is saved.
- On a tool's page: choose a photo, then pick This item only or Every {make} {model}, add a caption if you want, and press Add photo.
- A photo shared by make and model shows on every tool of that model. That saves taking the same picture 30 times.
Take photos in good light, close enough to read the name plate. Admins can find blurry or tiny photos under Admin → Photo quality.
Edit a tool
Who can do this Admin and Crib (the Edit tools right). Changing a tool's number also needs Change tool numbers (Admin).
On the tool's page press Edit, change the details and press Save. Edits show in the history. To change where it is or who has it, use the move buttons instead (see Moving tools).
Retire, reinstate or delete
Who can do this Admin (the Retire tools and Delete tools rights).
- Retire a tool that is gone for good. On its page, under Take it out of service, choose Why? (Sold, Scrapped, Lost, Stolen, Returned to vendor, Other), add a note and press Retire. It keeps its history and stops counting toward your plan.
- Reinstate: find it with Status → Retired, open it and press Bring back into service.
- Delete is only for a tool added by mistake that has no moves, service or requests. Anything with history can only be retired.
Admins can also tidy misspelt makes and models in one go under Admin → Make & model clean-up.
Everyday
05 · Moving tools
Check tools out and in to jobs, people and places, scan a truckload at once, get a signature, and work with no signal.
Who can move tools
Who can do this Admin and Crib (the Move tools right). PMs and field crews don't move tools themselves: they raise a request and the crib does the move.
Every move writes a line in the tool's history: what changed, when and who did it. If your company has Receivers accept transfers on, a move to a person waits for that person to accept it.
Check out and check in on the website
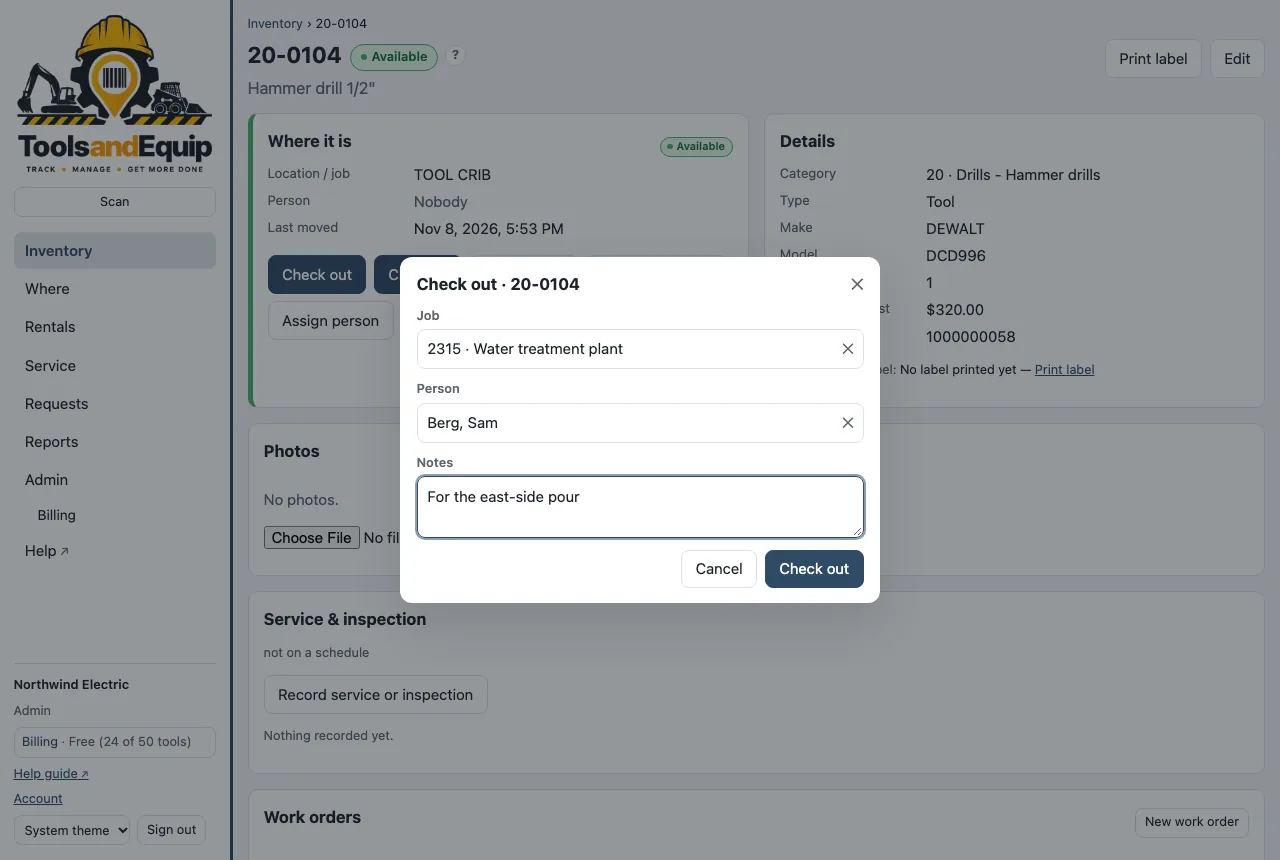
- Open the tool (search, or Scan its label).
- Under Where it is, press the move you want (see the list below).
- Fill in the box that opens and add Notes if useful.
- Press the button to save. A note confirms it, for example Check out: saved · now Out.
| Button | What it does |
|---|---|
| Check out | To a Job, a Person, or both. It becomes Out. |
| Check in | Back to a Location (required). It becomes Available. Tick Keep it in {name}'s name if the person keeps responsibility for it. |
| Move to job | From one job to another without coming back. |
| Move to location | Between your own places: yard, crib, trailer, shop. |
| Assign person | Put it in someone's name, or clear the name. |
| Send for service | It becomes In repair. Optionally say which shop or vendor it went to. |
| Back from service | Shown while a tool is in repair. Pick where it comes back to. |
| Mark missing | Nobody can find it. Add a note about where it was last seen. |
Booked for someone else soon? If the tool has a booking that has started or starts in the next 3 days for a different job or person, the box says so before saving, for example Booked Nov 20–24 for Main St Clinic (Fred) · confirmed — move to job anyway? See Moving a booked tool.
A kit moves everything packed in it, each item with its own history line. Move one item on its own and it leaves the kit. See Kits.
On the phone: Move and Check in
In the app, open a tool (scan it or search) and tap Move…. Choose:
- WHERE TO: Location, Job or Leave it where it is;
- WHO HAS IT: Keep current, Nobody or A person;
- STATUS: Work it out (the usual choice), or set it yourself;
- a Meter reading and Notes if you have them.
Then tap Move. Check in sends it straight back to your tool crib, held by nobody.
To move several at once, tap Select on the inventory (or press and hold a row), tap the tools, then Move…. Up to 200 at a time.
Scan out / Scan in (a whole truckload)
- In the app, open Scan out / in from the menu.
- Choose Check out or Check in at the top.
- Scan each tag. Each tool joins the Tray below. A Bluetooth or USB "wedge" scanner works too: type or scan into the box and press Return.
- Remove a wrong one with its ✕, or Clear the tray.
- Check out: tap Check out… and choose the job or place and who has them, once for the whole tray. Check in: tap Check in N and confirm.
If some fail, the app says which. The failed ones stay on the tray so you can try again.
Sign for it
When tools go to a job or a person from the phone, the app can ask the person taking them to sign:
- After you tap Next, the Sign for … sheet opens.
- Type the Name of the person signing.
- They sign in the box with a finger. Clear starts again.
- Tap Done, or Skip — no signature.
The signature shows under that move in the tool's history on the website (Show signature, for Admin and Crib). Signing works with no signal too.
Receivers accept transfers
Some companies want proof that a tool changed hands. With the company setting Receivers accept transfers on (Admin → Settings), a tool you check out or hand to a person waits until that person accepts it. Check-ins and moves to a place or a job that don't change who has it never wait. With the setting off (the starting point), every move happens at once, as described above.
What the giver sees
- Choosing a person in Check out or Assign person says {name} will be asked to accept it. After you save, the note says Sent to {name} to accept.
- The tool stays where it was, with you, until they accept: you are still answerable for it. Under Where it is it says Pending: waiting for {name} to accept.
- A whole tray from Scan out / in (or several tools picked at once) to one person is one transfer: they accept it once.
- While it waits you can Resend (ask again), Cancel transfer, or accept it right there with them (Accept now, below). Your waiting ones are listed under Transfers in the menu.
- If they decline, you are told (email and push) and the tools stay with you.
What the receiver sees
- A push and an email: Please accept: 3 tools from Kris (your notifications decide which). The website shows a bar A transfer is waiting for you to accept; the phone app shows To accept at the top of the inventory.
- Open it: the tools, who sent them and where they are going.
- Press Accept. The tools are now yours, and the history says Accepted by {name} on their device, with the time and the device.
- Or press Decline and say why (optional). Nothing moves.
Accepting works with no signal on the phone: it is saved and sent when the signal is back. If the tool was moved again in the meantime, the app says so and nothing changes.
Who can do this Accepting or declining: the person the tools were handed to (the login linked to that person in People). No right is needed.
Accept in person
When the receiver is standing at the crib, or has no phone or login, press Accept now on the tool, on the transfer, or under Transfers in the phone app's menu.
- No signature (the starting point): you see the receiver's name and the tools. Press Accept. The history says Accepted in person on {your name}'s device (no signature), with the time and your device. It's recorded under your name, because you pressed the button.
- With a signature: if your company ticks Ask for a signature when accepting in person, the button is Accept now (sign). They sign on your screen and the history says Accepted in person (signed by {name}) on {your name}'s device, with the signature under the move.
Those two never look alike in the history, the reports or the exports, and neither looks like Accepted by {name} on their device. A receiver accepting on their own phone or computer never signs.
On the phone, the Sign for … sheet at check-out works as before: a move to a person that they sign for is accepted at once. If you tap Skip — no signature, the move waits for them to accept.
Who can do this Anyone with Move tools (it happens on their device).
Confirm for someone
If your company allows it (setting Allow "Confirm for someone"), people with the right Confirm for someone can record that a receiver with no device took the tools: press Confirm for {name} and say how you know (a note is required). The history keeps who confirmed it and the note, and the receiver is told if they have a login.
Who can do this Admin (Confirm for someone), and only when the company setting allows it.
Pending transfers
Admin → Pending transfers (or Transfers in the menu) lists everything waiting in the company, with Cancel transfer, Resend and Accept now. Receivers are reminded by themselves after the hours set in the company setting (at most 3 times, between 7 am and 9 pm). History lists the decided ones: filter by Accepted on their device, Accepted in person (signed), Accepted in person (no signature), Confirmed for someone, Declined or Canceled, and export to Excel or CSV.
Who can do this Everything waiting, Cancel and Resend for anyone's: Admin (Pending transfers). The giver can cancel and resend their own.
When a tool moves again before it is accepted
- Any other move of a waiting tool (checked in, sent somewhere else, marked missing) takes it out of the transfer with a note, for example Moved again before Fred accepted. A transfer with nothing left is canceled, and the giver is told if someone else moved it.
- Sending it to another person replaces the first transfer.
- A late acceptance from a phone that had no signal changes nothing; the phone says why.
- An older scan still waiting on another phone shows up there as Moved by someone else since, with the waiting transfer as the reason.
No signal? Keep scanning
The app keeps a copy of your fleet on the phone, so scanning keeps working in a basement or out in the field. Moves, stock issues and audit scans are saved on the phone and sent by themselves when the signal comes back. A note at the top says No signal — scans and moves are kept on this phone and sent later.
Open Waiting to send in the menu to see what is waiting, or tap Send now.
Moved by someone else since: "Apply mine" or "Keep theirs"
If someone else moved the same tool after you scanned it, your move is held, not sent. In Waiting to send it shows who moved it, when, and where it is now. You choose:
- Keep theirs: drop your move. Their move stands.
- Apply mine: your move replaces theirs (the app asks you to confirm).
Something refused, for example a tool your role can't move? It shows the reason, with Retry and Drop.
Adding a tool and deleting your account need a connection. Don't sign out with changes still waiting, or they are lost.
Can't move a tool?
- No move buttons? Your role doesn't have Move tools. Ask the crib to do it, or raise a request.
- Retired tools can't be moved. An admin can bring one back into service first.
- A "Test mode" banner at the top means your company is trying Tools & Equip next to its old system. Tools copied from the old system are read-only there (marked real · read only), and only test tools numbered ZZ- can be moved.
Everyday
06 · Labels
Print QR labels on ordinary Avery sheets, use blank pre-printed labels, link any QR code or barcode to a tool, and scan them with any phone camera.
What a label does
Each label has a QR code, the tool number, a short description and your company name. Scan the QR code with any phone camera and the tool's page opens (after you sign in). It works in the Tools & Equip app too. The label keeps working if the tool's details change, and after re-imports.
Print labels
Who can do this Admin and Crib (the Labels right).
Open Admin → Labels, or press Print labels on the inventory (it uses your current filters), or Print label on a tool's page.
- 1. Which tools: One or a few, by number (type numbers separated by commas or spaces, then Find), The inventory list as filtered, Everything at a location, or All tools (not retired). Tick Only tools never labeled to skip ones you've done.
- 2. Label sheet: pick the Avery sheet you have (below). Click the first free label on the sheet picture if you are using a partly used sheet: Start at label N.
- 3. Print: press Make PDF. The PDF downloads. Open it and print.
- Stuck them on? Press Mark N as labeled. The tool pages then show when their label was printed.
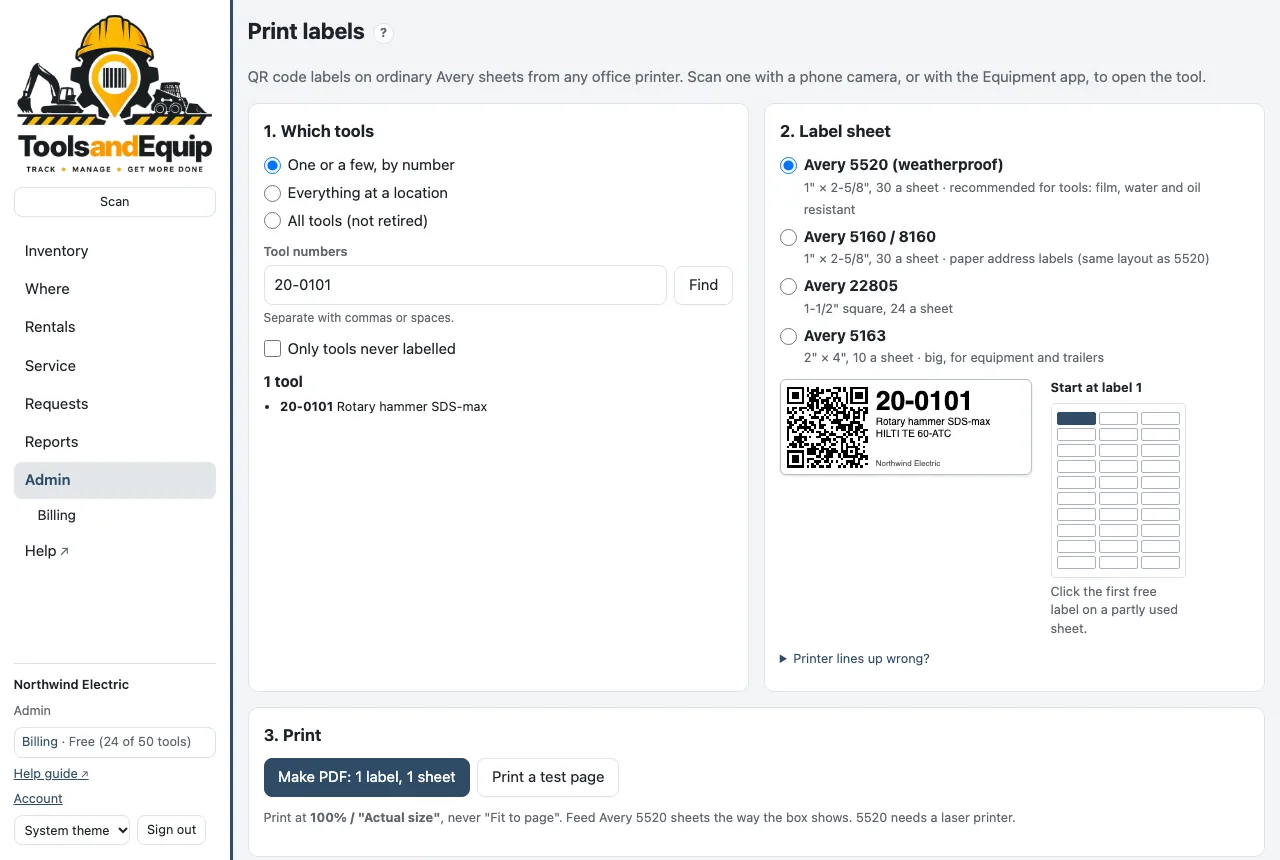
Which Avery sheet
| Sheet | Size | Best for |
|---|---|---|
| Avery 5520 (weatherproof) | 1" × 2-5/8", 30 a sheet | Recommended for tools. Film that stands up to water and oil. Needs a laser printer. |
| Avery 5160 / 8160 | 1" × 2-5/8", 30 a sheet | Paper address labels, same layout as 5520. Fine indoors. |
| Avery 22805 | 1-1/2" square, 24 a sheet | Small, square spots. |
| Avery 5163 | 2" × 4", 10 a sheet | Big: equipment, trailers, gang boxes. |
The page remembers your sheet on that computer.
Print it the right size
Always print at 100% or Actual size. Never "Fit to page" or "Shrink to fit": the labels would miss the sheet.
- Press Print a test page and print it on plain paper.
- Check the 2-inch ruler on it measures exactly 2 inches.
- Hold the test page over a label sheet against a window. The outlines should sit on the label edges.
- Off a little? Open Printer lines up wrong? and nudge it Right / left or Down / up (in inches; right and down are positive). Print the test page again. The nudge is saved for that sheet on that computer.
Feed the sheets the way the Avery box shows.
Blank pre-printed labels
Blank labels come printed in packs, each with its own QR code and a short code under it, like K7Q-M3X-PDH. They belong to nobody until you stick one on a tool and link it. After that, scanning it opens that tool, the same as a printed label.
Who can do this Admin and Crib (Edit tools or the Labels right). Someone who can only Add tools can link a fresh label to a tool, but not move one.
- 1. Stick the label on the tool.
- 2. Scan it with any phone camera, the website's Scan, or the app. The first time, you see "Blank label K7Q-M3X-PDH is not on a tool yet."
- 3. Link it: press Link to a tool…, type part of the tool number or description, and pick the tool. Or press Add a new tool with this label: the Add tool form opens, and the label is linked when you save.
From a tool's page you can do it the other way round: under Details, press Link a label, then scan the label or type its code. Case, spaces and dashes don't matter. The last character is a check: if you mistype one character, you are told it's not a label code, so a typo never links the wrong label.
A tool can have more than one label. A tool with a linked label counts as labeled on Print labels (Only tools never labeled leaves it out).
Label damaged, or the tool retired
- New label on the same tool: link the new one. Then press Unlink next to the old one on the tool's page.
- Move a label to another tool: link it to the other tool. You are asked first: "This label is on 45-3917. Move it to 60-0100?"
- Unlink: on the tool's page, press Unlink next to the label. Scanning it then opens nothing. It stays your company's, so you can link it to another tool later.
Every link, move and unlink is in the audit log.
Labels from another company
Once a blank label is linked, it belongs to that company. Anyone else who scans it sees only "This label belongs to another company." Someone who isn't signed in sees only that it is registered to a company on Tools & Equip. Nothing about the tool is shown.
A new label from a pack, and no account yet
Scan it with your phone's camera. The page says it's a Tools & Equip label, and that you can track the tool free (up to 50 tools, unlimited users). Press Start free, check your email with the 6-digit code, and create your company. You land back on the label: press Add your first tool with this label. If you have no categories yet, the form lets you add the first one.
Link any QR code or barcode
Your tools may already have codes on them: another product's QR label, the maker's barcode, an old sticker. You can link any of them to a tool, so scanning it opens the tool. This works for every scan: the website's Scan, the app's Inventory scan, Scan out / in and audits.
Who can do this Admin and Crib (Edit tools or the Labels right).
- Scan the code. If no tool has it, press Link to a tool… and pick the tool.
- Or on the tool's page: Link a label, then scan the code.
- When you add or edit a tool, a web link or a code too long for Barcode scanned into that field is linked to the tool when you save.
These codes are your company's only: another company can link the same code to its own tool. A code that is already a tool's Barcode or number needs no link: scanning it finds that tool already.
Scan a label
- Any phone: open the camera and point it at the QR code, then tap the link. You may need to sign in the first time.
- On the website: press Scan at the top (on a device with a camera). Hold steady, about a hand's width away.
- In the app: tap the camera button by the search box, or use Scan out / in.
- USB or Bluetooth scanner: click in a search or scan box and scan. It types the code for you.
The scanner also reads ordinary barcodes (Code 128, Code 39, UPC, EAN, Data Matrix and more), so the barcodes already on your tools work if they are in the tool's Barcode field, or linked to the tool (above).
No signal in the app? A label or code that is already linked still finds its tool from the copy on the phone. Linking a new one needs a connection.
Label won't scan? See A label won't scan.
More features
07 · Kits
Gang boxes, trailers and job boxes with what is packed in each. Move the kit and everything goes with it.
What a kit is
A kit is a tool that other tools travel in: a gang box, a trailer, a job box. Pack tools into it, and moving the kit moves everything in it, each with its own history line. Tools in repair or missing keep that status.
See all kits under Admin → Kits: where each one is, how much is packed, what is not with it, and the value.
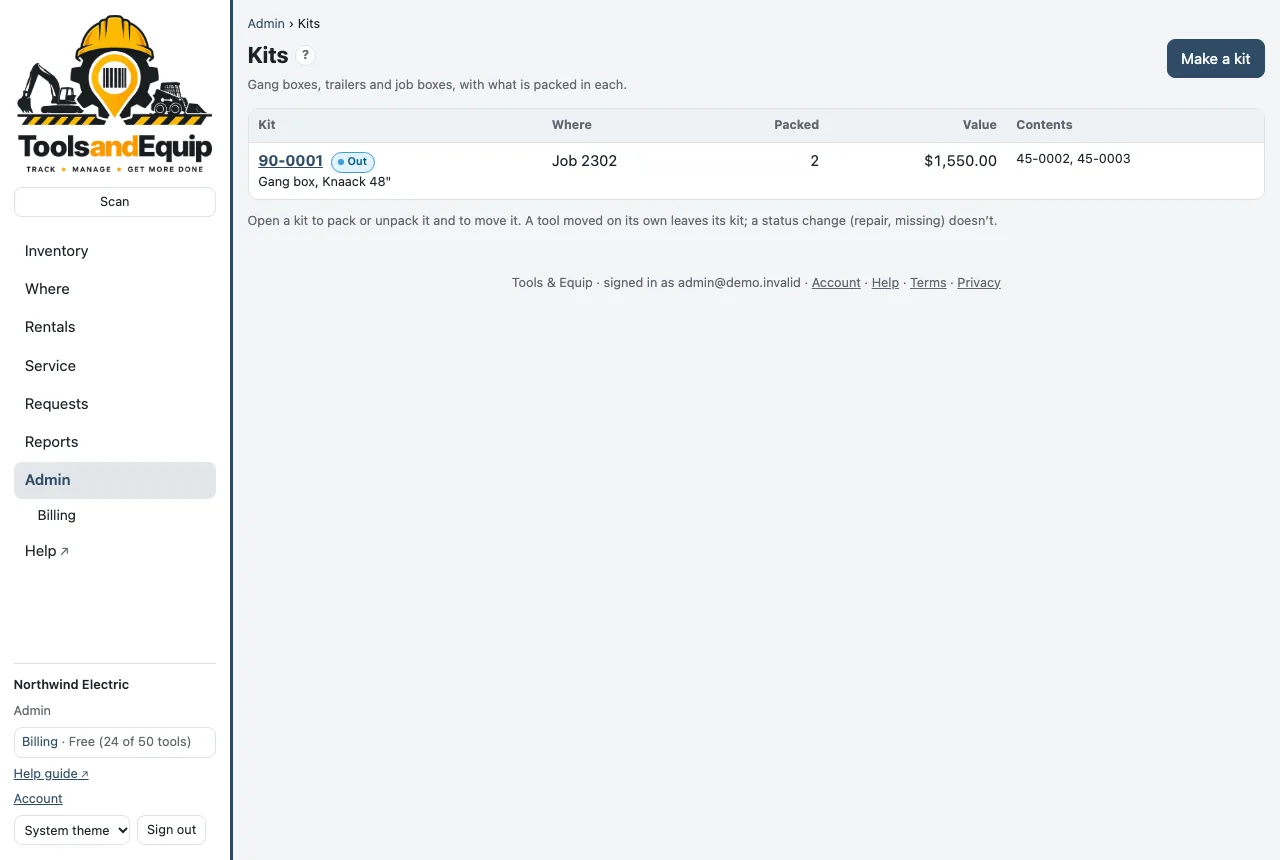
Make a kit
Who can do this Admin and Crib (the Kits right).
- The box or trailer needs its own tool number and label. Add it as a tool first if it isn't one.
- Open its tool page and press Make it a kit. Or on the Kits page, use Make a kit and pick it.
- In Kit contents, scan or type the numbers of the tools that go in it (separate several with spaces) and press Pack.
Change what is in it
- Take out beside a tool removes it from the kit. It stays where it is.
- Moving a tool on its own takes it out of its kit automatically.
- A tool that is packed but not where the kit is shows not with the kit.
- Unpack all empties the kit and stops treating it as one.
Audit a kit by scanning it: start an audit of the kit and scan what is inside. Tick "Scanning a kit counts what is in it" for a sealed box.
More features
08 · Consumables
Counted stock like wire nuts, blades and tape: what is on the shelf, what went to which job, and what to order.
Stock you count instead of track
Consumables are things you count rather than label one by one. Open Admin → Consumables. The tabs are:
- Stock: how many are on hand at each place (and bin). Below the minimum shows in red.
- Items: the list of things you stock, with SKU or barcode, unit, cost and vendor.
- Reorder list: everything at or below its minimum, with how many to order.
- History: every receive, issue, return, move and count.
Who can do this Everyone can look. Issuing needs Issue stock; receiving, moving and counting need Receive and count stock; adding items and setting min/max needs Manage consumables. By default Admin and Crib have all three.
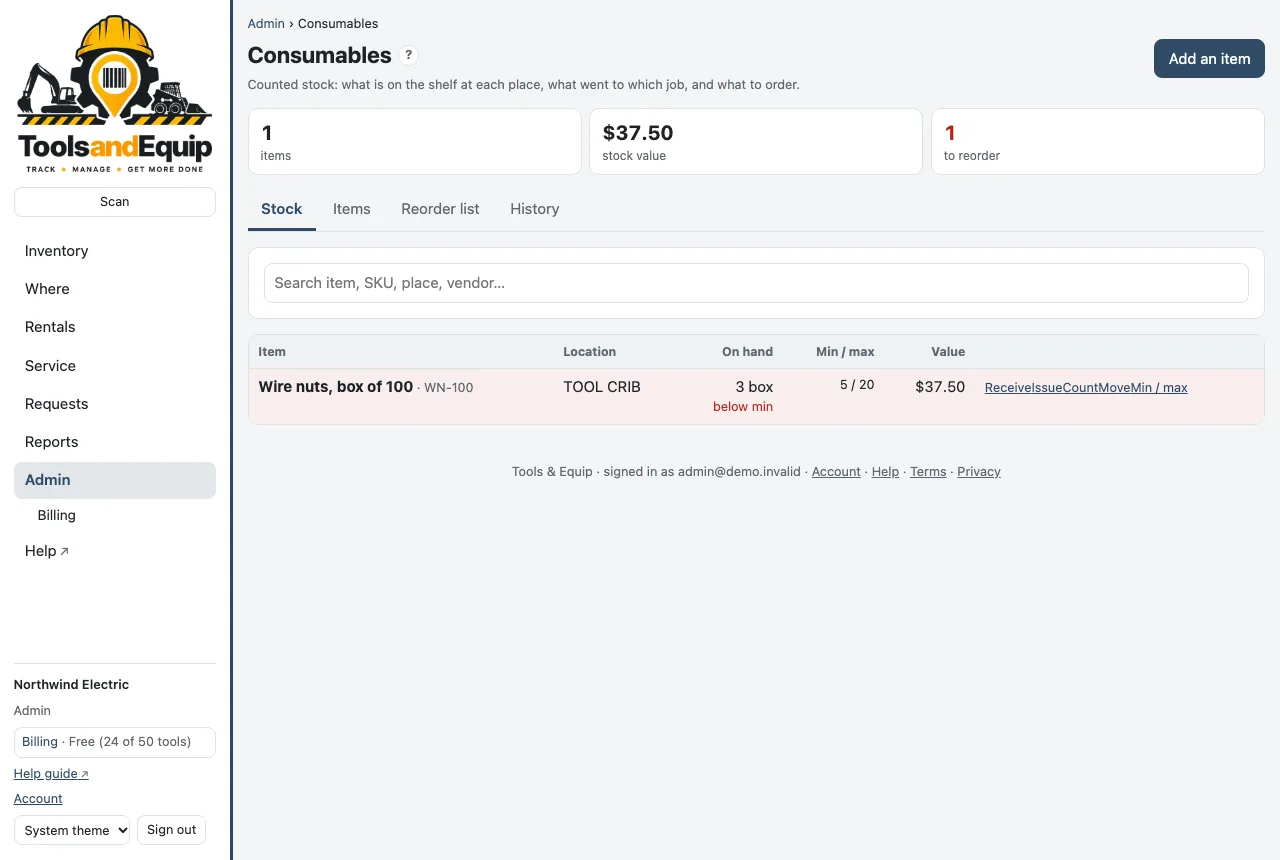
Add an item
- Press Add an item.
- Fill in the Name and, if you have them, SKU, barcode, unit (each, box, ft, roll…), unit cost, category and vendor.
- Save. Then receive the first delivery to put stock on the shelf.
Receive, issue, return, move, count
- Receive a delivery: on Stock, press Receive, pick the place, the quantity, and optionally the unit cost and vendor.
- Issue to a job or person: press Issue, pick where it comes from, the quantity, and the job, person or both. Issued stock counts in Cost to jobs.
- Return what comes back unused: Return on the Items tab.
- Move between places, or Count the shelf: type what you actually counted and the stock is set to it.
- Min / max: the reorder point (Minimum), how far to order up to (Maximum), and the bin.
The phone app has Consumables too: scan a bin or search, then issue or receive. It works with no signal and sends later.
Order what is low
The Reorder list shows everything at or below its minimum, grouped by vendor, with how many to order: up to the maximum, or twice the minimum if no maximum is set. Export it to Excel or print it for the buyer.
More features
09 · Reservations
Book equipment for a job ahead of time and see clashes before anyone is let down.
See what is booked
Open Calendar in the menu. The calendar has Month and Week views and ‹ Today › to move around. A ⚠ marks a clash: the same tool booked twice, or more of a category than you have.
Booking statuses: Requested, Confirmed, Out, Returned and Canceled. Bookings past their end date with tools still out are flagged as overdue.
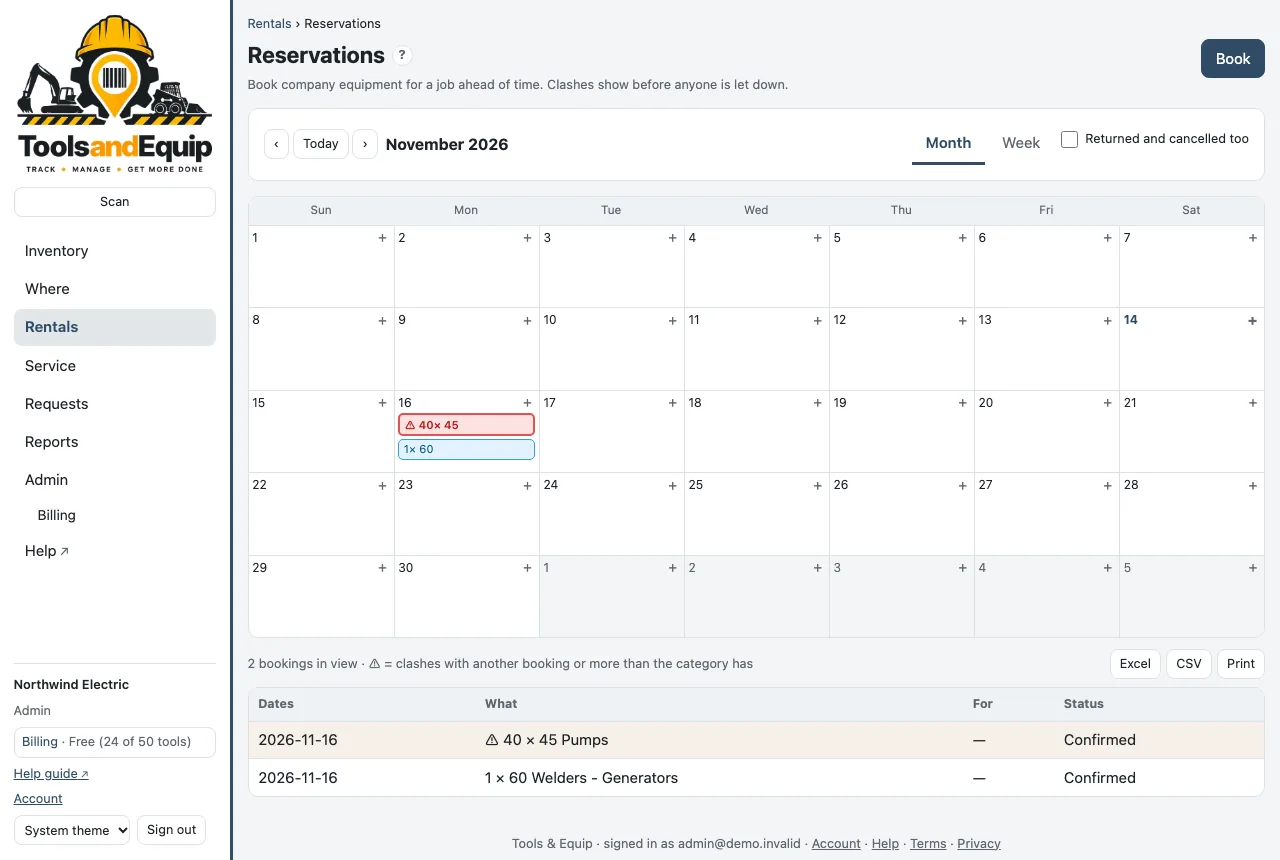
Color the calendar by job or person
Jobs and people can each have a color (see Admin). Above the calendar, Color by chooses how bookings are colored, just for you in this browser:
- Status (the usual look): blue confirmed, dashed requested, green out.
- Job or Person: each booking is filled with its job's or person's color, with black or white text so it is easy to read in light and dark mode. Bookings whose job or person has no color stay gray. A requested booking keeps its dashed edge.
A ⚠ (clash) and a ⏱ (overdue) with a red outline still show whatever the color. The day list and the table under the calendar show the same color dot.
Under the calendar, a legend lists the jobs or people in view with their colors. If you have the Jobs right (or People, for people), click one to set or change its color right there.
Pick a color
The color picker has a row of 12 ready-made colors that read well on a light or a dark screen, Custom… for any other color (the system color picker, or type a code like #2E7D32), and the striped circle for no color. Custom colors you picked lately are offered again next to the ready-made ones.
Booking details and quick actions
Right-click a booking on the calendar (on a phone or tablet: press and hold it for about half a second) to see its details in a small box next to it: the equipment, job, person, dates, status, clashes and notes. From there you can Open it and, if you are allowed, Confirm, Check out…, Change, Move to… or Cancel booking. With the keyboard, move to a booking and press Shift+F10 (or the menu key). Escape or a click outside closes it. A plain click still opens the booking as before.
Move a booking by dragging
Who can do this Admin and Crib (Manage bookings) for any booking; Book tools for their own. Only while it is requested or confirmed.
- Drag a booking to another day, in the month or the week view. On a phone or tablet, press and hold it, then slide your finger. The day it would land on is highlighted.
- It keeps its length: a 4-day booking dragged one day later starts and ends one day later. A note says Moved 38-0010 to Nov 21–24 with Undo to put it back.
- If the new days clash, nothing moves and the page says why. The crib can Move anyway (overbook).
- Without a mouse: open the booking's details (Shift+F10) and use Move to… with a date.
Book equipment
Who can do this Admin, Crib and PM (Book tools). A PM's booking is a request until the crib confirms it.
- Press Book (or the + on a day of the calendar).
- Choose One particular tool, or Some of a category (any of them) and How many.
- Set From and To (last day), the Job, the Person and any notes.
- Save. If it clashes, you see why. Pick other dates, or ask the crib.
Reserve from a tool or the inventory
Who can do this Admin, Crib and PM (Book tools).
- On a tool's page, press Reserve… under Where it is. The booking form opens with One particular tool and that tool already filled in. Set the dates, the job and the person, and save.
- For several tools, press Select tools in the inventory (Select to reserve if you don't fill requests), tap the tools (across pages and searches), then Reserve…. Each tool gets its own booking, all with the same dates, job and person, so each one can be confirmed, checked out or canceled on its own.
- If some of them clash, the rest are booked and the form lists the ones that clash and why. The crib can Book them anyway (overbook); anyone else closes the form and picks other dates for those, or asks the crib.
- A PM's bookings are requests until the crib confirms them, the same as from the calendar.
See a tool's bookings
A tool that is booked in the next 60 days says so under Where it is on its page, for example Booked Nov 20–24 for Main St Clinic (Fred) · confirmed. Click the line to open the calendar at that date. In the inventory the tool has a booked 11/20 tag (booked to 11/24 once the booking has started).
Bookings of Some of a category don't name a tool, so they show on the calendar only.
Moving a booked tool
If you move a tool, or add it to a request, while it has a booking that has started or starts in the next 3 days for a different job or person, the box warns you before anything is saved: Booked Nov 20–24 for Main St Clinic (Fred) · confirmed — move to job anyway? Press … anyway to go ahead or Don't to change your mind. Moving it to the booking's own job or person doesn't warn. Check in, Back from service and Mark missing never warn.
The booking stays on the calendar either way. If the tool won't be back in time, tell the crib or the person who booked it.
Confirm, check out and return
Who can do this Admin and Crib (Manage bookings).
- Confirm a requested booking.
- Check out… when it leaves: for a category booking, scan or type which tools go. Each gets an ordinary check-out in its history.
- Returned when it is back.
- Book anyway (overbook) lets the crib book over a clash on purpose.
- Change or Cancel booking. People without Manage bookings can change or cancel only their own, while it is still requested or confirmed.
More features
10 · Requests and rentals
Ask the crib for equipment or report a problem, and keep track of equipment hired in from a vendor.
Raise a request
Who can do this Everyone with Raise requests (by default Admin, Crib, PM and Field).
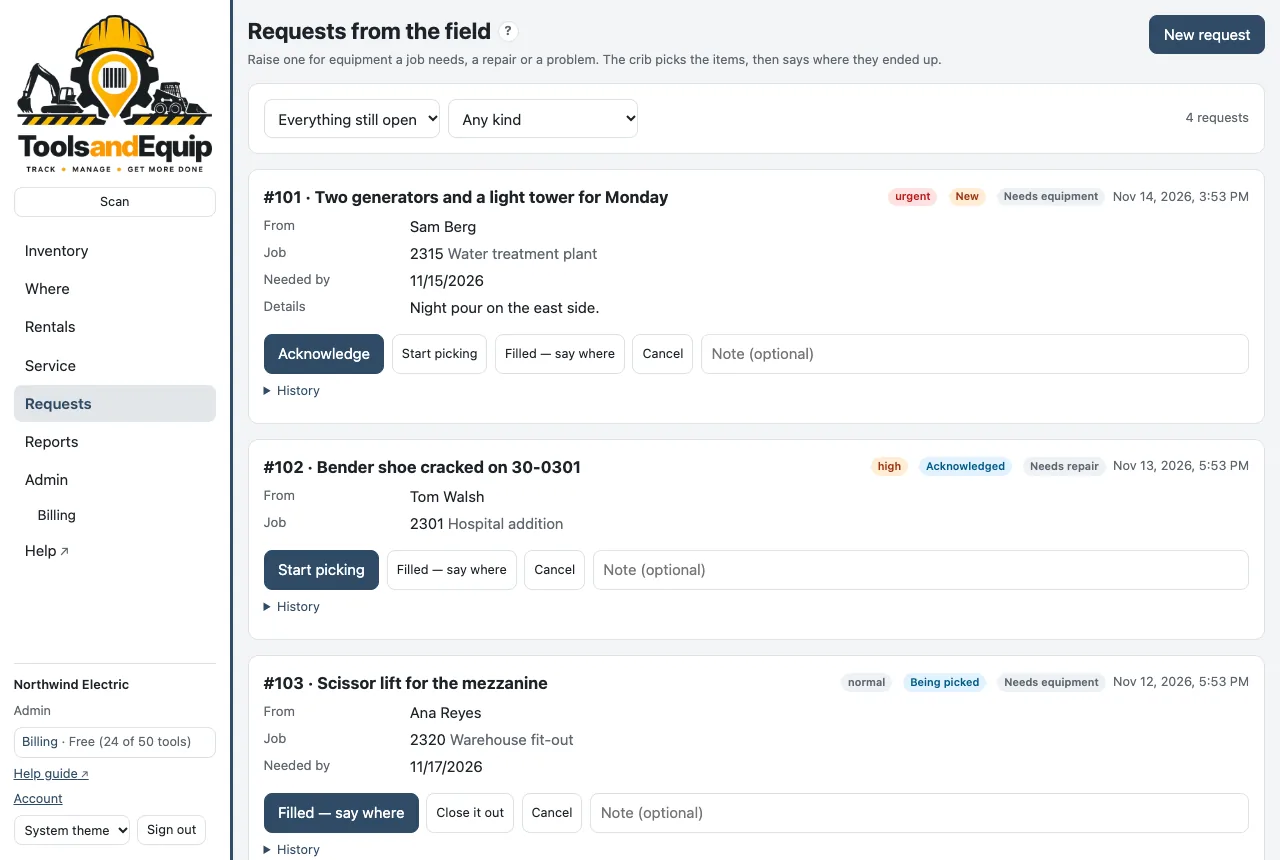
- Open Requests and press New request.
- Say What is needed, for example "Two generators and a light tower for Monday".
- Pick the Kind: Needs equipment, Needs repair, Problem, Ready to be picked up or Being dropped off.
- Set the Priority (urgent, high, normal, low), the Job, the Superintendent and Needed by.
- Optional: list the exact tools under Items: type part of a tool's number or name and press Add next to it, press Enter on a number or barcode, or press Scan. A tool that is already on someone else's open Needs equipment request can't be listed again; the message says whose request it's on.
- Press Raise it. You can also press Request this… on a tool in the phone app.
Field crews see the requests they raised. PMs also see what is happening on their own jobs.
Email or push about new requests depends on your company's notifications. If the confirmation says no email is sent yet, tell the crib yourself.
Work a request (crib)
Who can do this Admin and Crib (Work requests).
Requests move through New → Acknowledged → Being picked → Filled → Closed (or Canceled). Urgent ones sort to the top.
- Open the request and press Acknowledge so the requester knows it's seen.
- Start picking while you pull the tools, and put each one on the request's pick list (below). You don't have to move them yourself.
- Filled — say where: pick the place or job where the equipment is, and say it in your own words, like "on the flatbed, leaving at 6am". That line is what the requester is told. On a Needs equipment request this also checks the tools on the pick list out to the requester.
- Picked up — close when it's gone, or Close it out. Reopen brings a closed one back.
Fill a request with a pick list
Who can do this Admin and Crib (Work requests). Filling also needs Move tools, because it checks the tools out.
Build the request as you find the tools, in as many goes as you need (today, tomorrow, after the delivery comes in). Nothing moves until you press Filled — say where.
- Put tools on a request in any of these ways:
- On the request, press Add tools. Type part of a tool's number, name, make or model and press Add next to it, or press Enter on a tool number or barcode. Scan keeps the camera open: every label you scan goes on the list, then close the scanner.
- On a tool's page, press Add to a request….
- In the inventory, press Select for a request (Select tools if you can also book), tap the tools (across pages and searches), then Add to a request…. A tool booked soon for another job or person gets a warning first (Moving a booked tool).
- Choose An open request (urgent ones first, then the newest; search by number, what is needed or who asked), or For a person. For a person, their open request is offered; otherwise choose New request for them (Needs equipment, the job is optional). They are the requester: they see it and are told about it, as if they had raised it.
- The tool stays where it is. Its page says On request #123 for Fred (being picked) and the inventory shows #123 → Fred, so nobody else grabs it. The first tool on a New or Acknowledged request sets it to Being picked.
- Changed your mind? Press remove next to the tool on the request, or Take it off the request on the tool's page.
- When it's all there, press Filled — say where, pick the place or job and add a note. The box tells you what is about to happen. At that moment every tool on the list is checked out to the requester, on the job you picked (or the request's job). If you picked a place, they stay staged there in the requester's name. Each tool gets one line in its history: Filled request #123 for Fred: on the flatbed, leaving 6am.
- The requester is told it's filled, with where it is, your note and the list.
- One open request per tool. A tool can be on only one open Needs equipment request. Adding it to another says 45-0002 is already on request #123 for Fred (being picked). Take it off that request first. The other tools you chose still go on. Repair and problem reports can name any tool.
- More after it's filled. Press Back to picking, add the rest, and press Filled — say where again. Only the tools that aren't with the requester yet move.
- Not moved (the request's history says why): tools already with the requester, retired tools, real tools in test mode, and kit contents whose kit is on the list too (they go with the kit).
- Close it out isn't offered while you are picking a list, because it would skip the move. Press Filled — say where first.
- Only Needs equipment requests move their tools. On the other kinds the list is just a list.
- With Also for request pickups on (below), nothing moves when you fill it. The tools go to the requester when they accept the pickup.
Each tool's history keeps the proof: Added to request #123 for Fred (and who added it), Removed from request #123, and the check-out for the request.
What the requester sees
On Requests (website and phone app) the requester sees their request's pick list with where each tool is right now, and once it's filled, Where it is with the crib's note. Only the crib can change the list.
When the requester must accept the pickup
With the company setting Receivers accept transfers and Also for request pickups on (Admin → Settings), Picked up — close on a Filled request (kinds Needs equipment and Ready to be picked up) doesn't close it straight away:
- The request stays Filled and says Pending: waiting for {name} to accept the pickup. The requester gets a push and an email.
- The requester presses Accept on their phone or computer (under Transfers, or the To accept list in the app). Or, at the crib, press Accept now with them there (they sign on your screen if your company asks for a signature).
- Then the request closes. The tools on the pick list are checked out to the requester (and the job, if one was given), and the history says who accepted it and how: that's the proof it was picked up. (With this setting on, Filled — say where moves nothing; the acceptance does.)
If they decline, the request stays Filled and you see why. Changing the request to anything else (Back to picking, Cancel) calls off the waiting pickup. Requests with no items still need the acceptance; nothing moves, the request just closes. A requester with no login can only accept in person.
Who can do this Closing: Admin and Crib (Work requests). Accepting: the person who raised the request. Accept now: anyone with Move tools.
Rented equipment
Rentals keeps a record of equipment hired in from a vendor, so nothing stays on rent by accident. The tiles show what is on hire, what should be back already, what is on jobs, and the cost so far.
Who can do this Admin, Crib and PM can add rentals and change the ones they added (Add rentals). Admin and Crib see and change every rental and can cancel one (Manage all rentals). A PM sees the hire on their own jobs.
- Press Add a rental.
- Fill in What has been hired, the vendor and their reference, the job and person, On hire from, Expected back, and the rate per day, week or month.
- Press Add it.
- When it goes back, press Returned, give the date and, if you have the invoice, the Final cost.
Without a final cost, the page shows an estimate from the rate and the days on hire (marked with ~). It is not an invoice.
More features
11 · Service, inspections, work orders and meters
See what is due, record services and inspections, plan by hours or miles, and track repairs with work orders: assign them, work them, close them.
What is due
Open Service. Service & inspection due lists tools with an overdue inspection, an overdue service, nothing ever recorded, or something coming due. Choose How far ahead (overdue only, 30 or 90 days) and the Kind. Click a row to open the tool. Export to Excel or CSV, or print.
Who can do this Everyone can look.
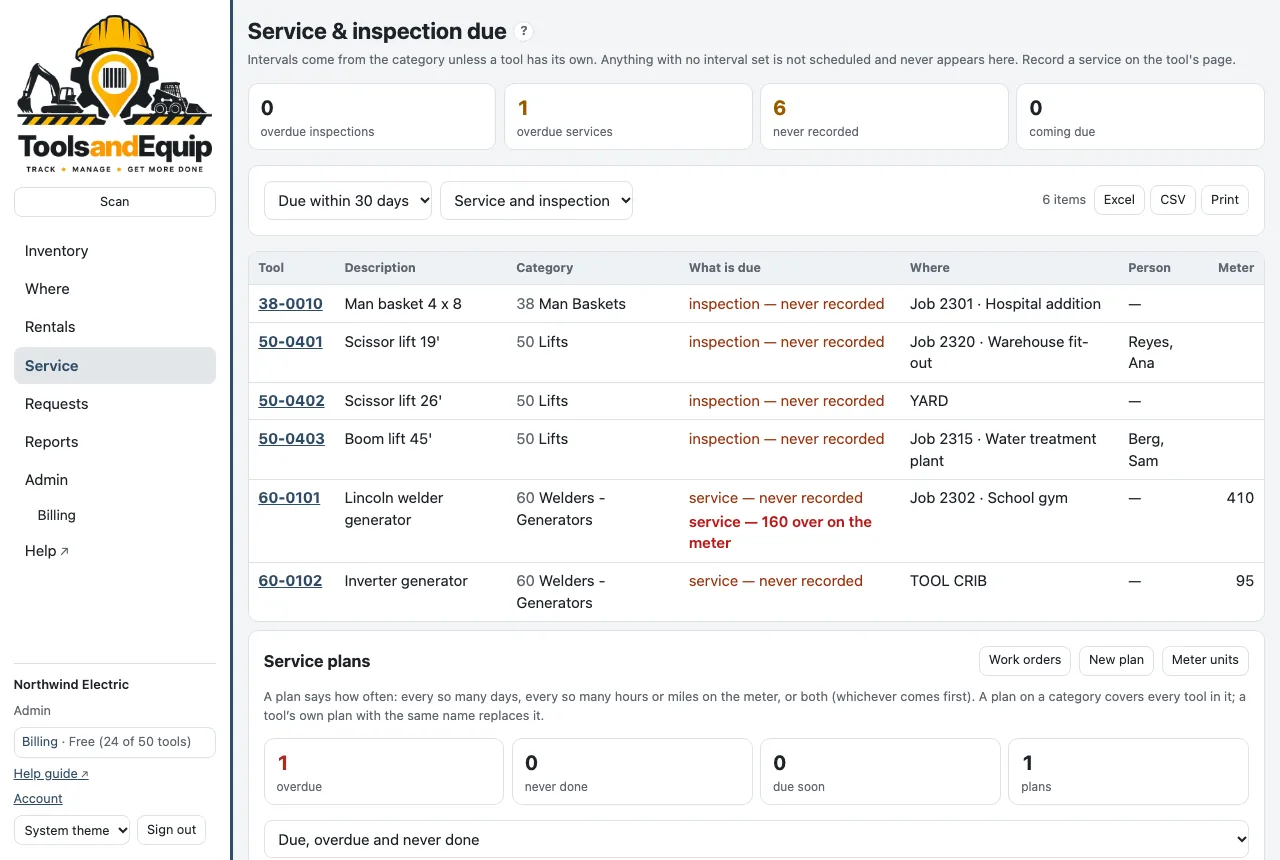
Only tools with an interval appear. Set intervals on the category: Admin → Categories and service intervals → Service every (days), Service every (meter), Inspect every (days). Every tool in the category inherits them.
Record a service or inspection
Who can do this Admin and Crib (Record service).
- Open the tool and, in Service & inspection, press Record service or inspection.
- Choose Record: Service, Inspection or Repair. Set the Date and Meter now.
- For an inspection, set the Inspection result: Passed, or Failed: take it out of service.
- Add who did it, the vendor, the cost and notes, then press Record it.
A failed inspection takes the tool out of service (status In repair). You are asked to confirm first.
The phone app has Record service… on each tool too.
Service plans by hours or miles
Who can do this Making plans and meter units: Admin and Crib (Service plans and meters). Marking a plan done: Record service.
A plan says how often: every so many days, every so many hours or miles on the meter, or both (whichever comes first). For example "Oil change every 250 hours" for the welders. A plan on a category covers every tool in it; a tool's own plan with the same name replaces it.
- At the bottom of Service, press Meter units and set what each category's meter counts (hours, miles or km).
- Press New plan. Choose Every tool in a category or One tool, give it a Name, a Kind, and Every … days and/or Every … on the meter. Save.
- When the work is done, press Done… on the tool's row, enter the date and meter, and Record.
Meter readings
A meter reading is saved whenever you record a service, mark a plan done, or close a work order. The tool page lists them under Meter readings; the app has Log meter….
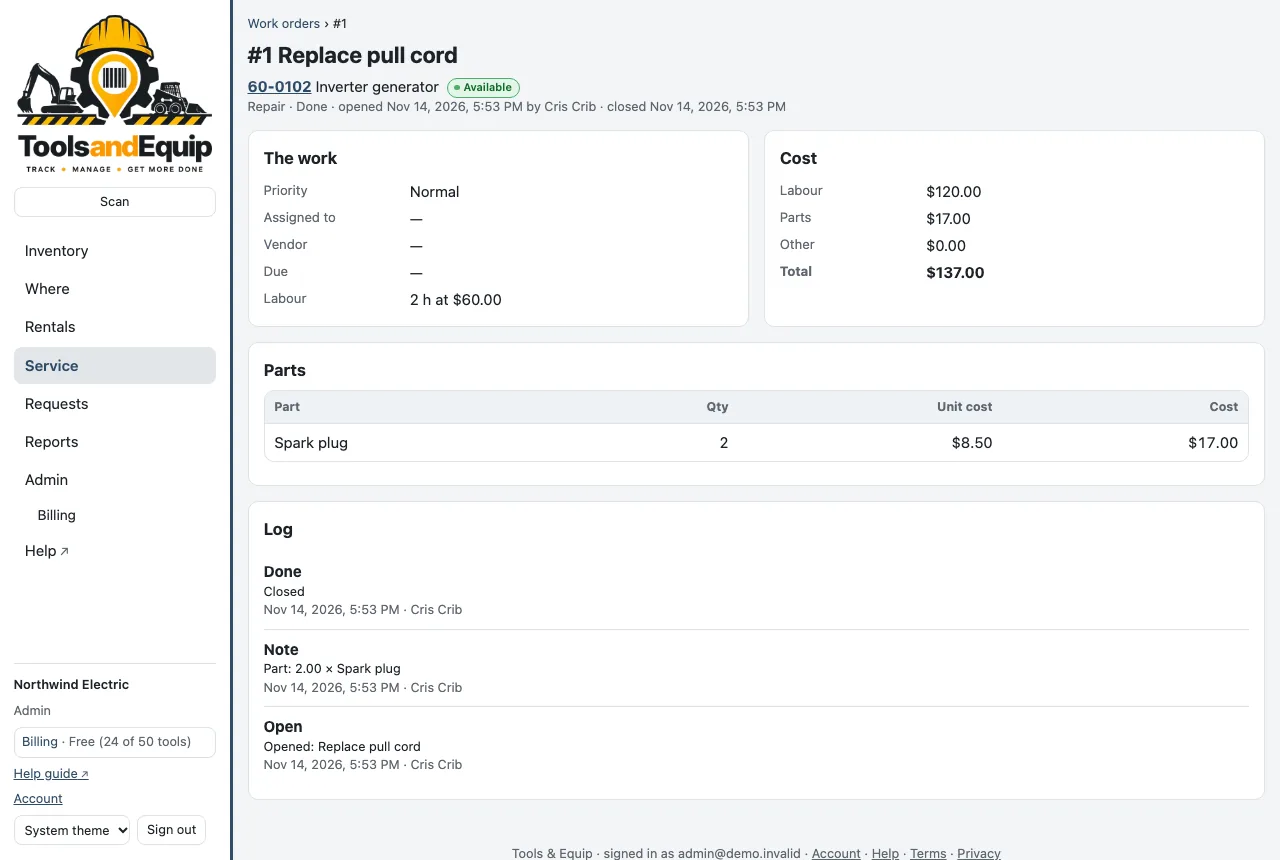
Work orders
Who can do this Everyone can read work orders. Opening, assigning, changing and canceling them: Admin and Crib (Work orders). Working one that is assigned to you: Crib, PM and Field (Work assigned work orders).
Use a work order for a repair or service with parts, labor and cost, and give it to whoever will fix it. Work orders is in the main menu: the number beside it is how many are open (for those who run work orders) or how many are open and assigned to you.
Open one and give it to someone
- Press Work orders → New work order (or use the Work orders card on the tool's page).
- Pick the Tool, the Kind (Repair, Service, Inspection), the Priority and a Title like "Replace pull cord", and a due date.
- In Assigned to, choose who fixes it:
- Someone with a login: they are told at once (email and the phone app) and can update it themselves.
- A person without a login (from People, for example the shop mechanic): nobody is told; you update the work order for them.
- An outside vendor or shop: the name, and optionally an email and phone number. Tick Email them this work order to send them what needs doing, the equipment (number, make, model, serial) and the due date. Their reply comes to you. You update the work order as they report back; Email the work order again resends it.
- Nobody yet: everyone who runs work orders is told there is a new one to take.
- Check Take it out of service, then press Open work order. For a repair it is ticked already: the tool shows as in repair until the work order is done. Untick it for a small fix while the tool is still in use. A service or an inspection leaves the tool available unless you tick it.
While a work order holds a tool in repair, the tool's page says In repair — WO #123 (a link to the work order) and the inventory row shows WO #123. Closing the work order makes the tool available again where it was; canceling it puts the tool back as it was before.
See them all
The Work orders page lists them with who has each one (marked no login, vendor or you) and the due date; overdue ones are marked. Choose Open, Open and assigned to me, Open, nobody assigned or All, closed too, and the Kind. If you don't run work orders, the page opens on the ones assigned to you. Export to Excel or CSV, or print.
Work it
Whoever has it, or someone who runs work orders, opens it and:
- sets the Status: Open, In progress, Waiting for parts;
- logs Labor hours (the Labor rate / hour, other cost, priority, due date and who has it are set by those who run work orders);
- presses Add a part: from your consumables stock, or bought in;
- adds notes and photos on the Timeline: what was found, what was ordered, a picture of the broken part.
The Cost card adds it all up. Every change is on the timeline with who made it and when.
Close it when it's done
- Press Close…: the date, the meter reading, the result for an inspection, and (with Move tools) where the tool comes back to.
- Press Close work order.
Closing writes the tool's service log with the total cost and marks its service plan done. A tool the work order took out of service becomes available again where it was (also when the person who closes it can't move tools); with Move tools you can pick another place. A failed inspection keeps it in repair, and so does another open work order that holds the same tool. Only those who run work orders can cancel one.
Who is told
- Assigned to you: when a work order is assigned or reassigned to you.
- New work orders: one is opened with nobody assigned (those who run work orders).
- My work orders' progress: one you opened (or that came from your request) is started, waiting for parts, done or canceled; and the person it was assigned to hears when it is canceled.
- Overdue work orders: once a day after 7 am, each open work order past its due date, to whoever has it; when a vendor or someone without a login has it, to whoever opened it.
Each person turns these on or off in Settings → Notifications. When an admin turns Work orders off in Settings → Features, nothing about work orders is sent.
On the phone app, My work orders lists yours; open one to change its status, add a note or photo, and close it when it's done (this needs a signal). A work order notification opens it. A tool in repair shows In repair — WO #123 on its page in the app too.
More features
12 · Audits by scan
Scan what is really at a place, kit, job or person and compare it with what the system says.
How an audit works
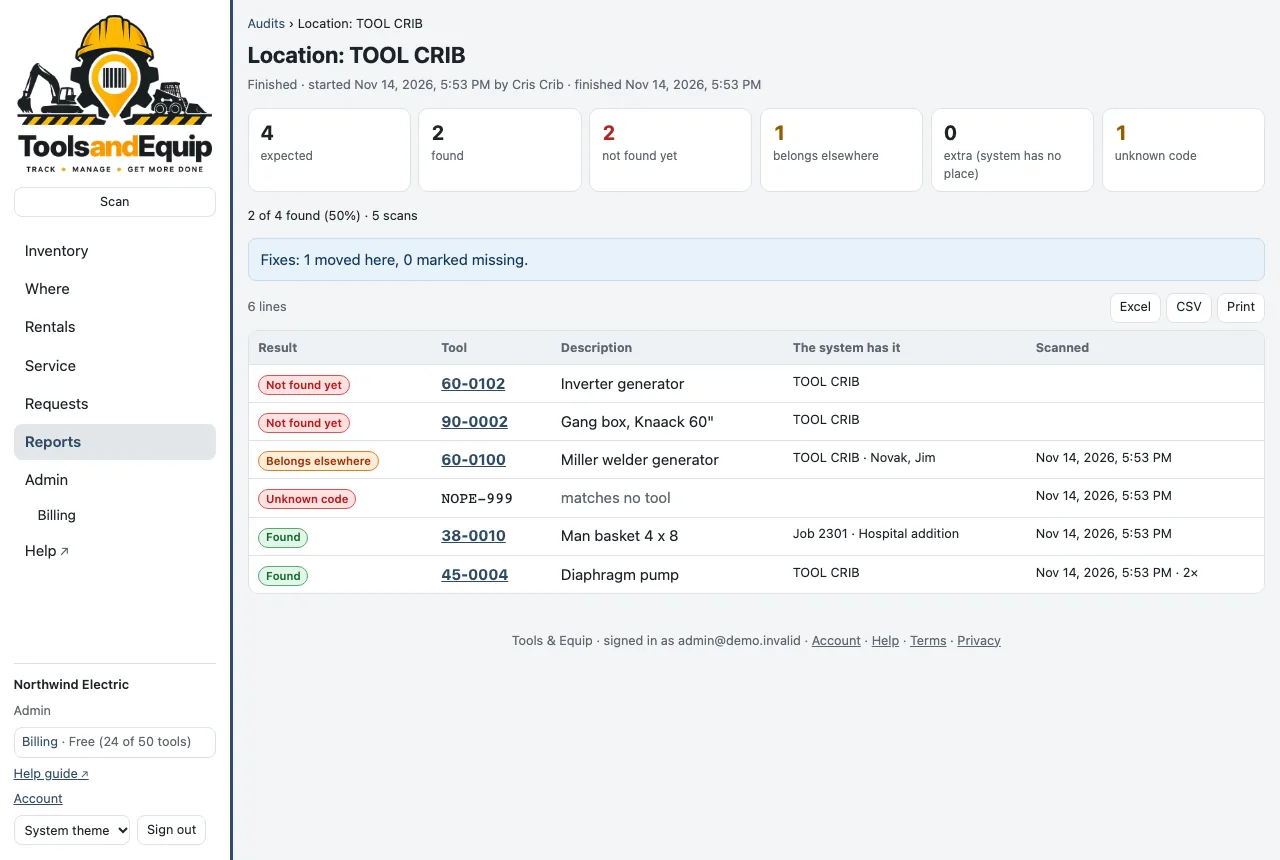
When you start an audit, Tools & Equip takes the list of what should be there. You scan what you actually find. It sorts every tool into found, not found yet, belongs elsewhere (here, but the system says somewhere else), extra and unknown code. Moves made during the audit don't change the list.
Who can do this Everyone can see audits. Starting, scanning, finishing and canceling: Admin and Crib (Audits). Applying the fixes also needs Move tools.
Start an audit
- Open Reports → Audits and press Start an audit.
- Choose Audit a: Location, Kit, Job or Person, and pick which one.
- For a sealed box, tick Scanning a kit counts what is in it.
- Press Start.
Scan
- On a computer with a USB scanner: the scan box is ready. Scan each label; the box clears for the next one. You can also type a number and press Enter or Add.
- On phones: open Audit by scan in the app and pick the open audit. Several people can scan into the same audit at once. Their scans show up on the website by themselves every few seconds.
- Scanned a wrong one? Under Scans, press Remove.
- Click a tile (found, not found yet…) to show just those.
Finish and fix
- Press Finish….
- Choose the fixes you want: Move the N found here but recorded elsewhere to here and Mark the N not found as missing.
- Press Finish.
The fixes are ordinary moves, each in the tool's history. Without them, the audit only reports. Export the result to Excel or CSV, or print it. Cancel audit drops it with nothing changed.
More features
13 · Documents
Keep manuals, warranties, receipts and certificates with each tool, and see what is about to expire.
Add a document to a tool
Who can do this Everyone can open documents. Adding, changing and deleting: Admin and Crib (Documents).
- Open the tool and, in Documents, press Add a document.
- Choose the File: a PDF or a photo (JPEG, PNG or WebP), up to 25 MB. The title fills in from the file name.
- Pick the Kind: Manual, Warranty, Receipt, Calibration, Inspection, Registration, Insurance or Other.
- Set the Issued and Expires dates if it has them.
- For a manual, choose Every {make} {model} under Covers so it shows on every tool of that model.
- Press Add.
Click a document's title to open it. Each one shows when it expires, for example "Expires in 12 days".
Documents are for a tool's own paperwork. To redline the job's drawings, place symbols and count devices on the PDF, there is Rough-In Redlines, also from us, on iPad, iPhone, Mac and Windows.
What is expiring
Open Reports → Documents expiring for every document with an expiry date, soonest first. Expired ones show red; ones within 30 days show amber. Click the tiles for expired or expire within 30 days. Export or print the list.
People with the Documents right can get a daily email of what has expired or expires within 30 days. Turn it on in Notifications.
Office
14 · Reports
Where the fleet is, cost to jobs, the activity ledger, and getting any list into Excel.
The Reports page
Reports collects every report in one place. Each one is built fresh when you open it, so it shows where things stand right now. Every table exports to Excel or CSV, and most print.
- The fleet: Where the fleet is, the inventory list, missing tools.
- Work to do: service and inspections due, rented equipment, requests, work orders, reservations, the reorder list.
- Cost and checks: cost to jobs, audits, documents expiring.
- History: activity, and the audit log for admins.
Where the fleet is
Who can do this Everyone.
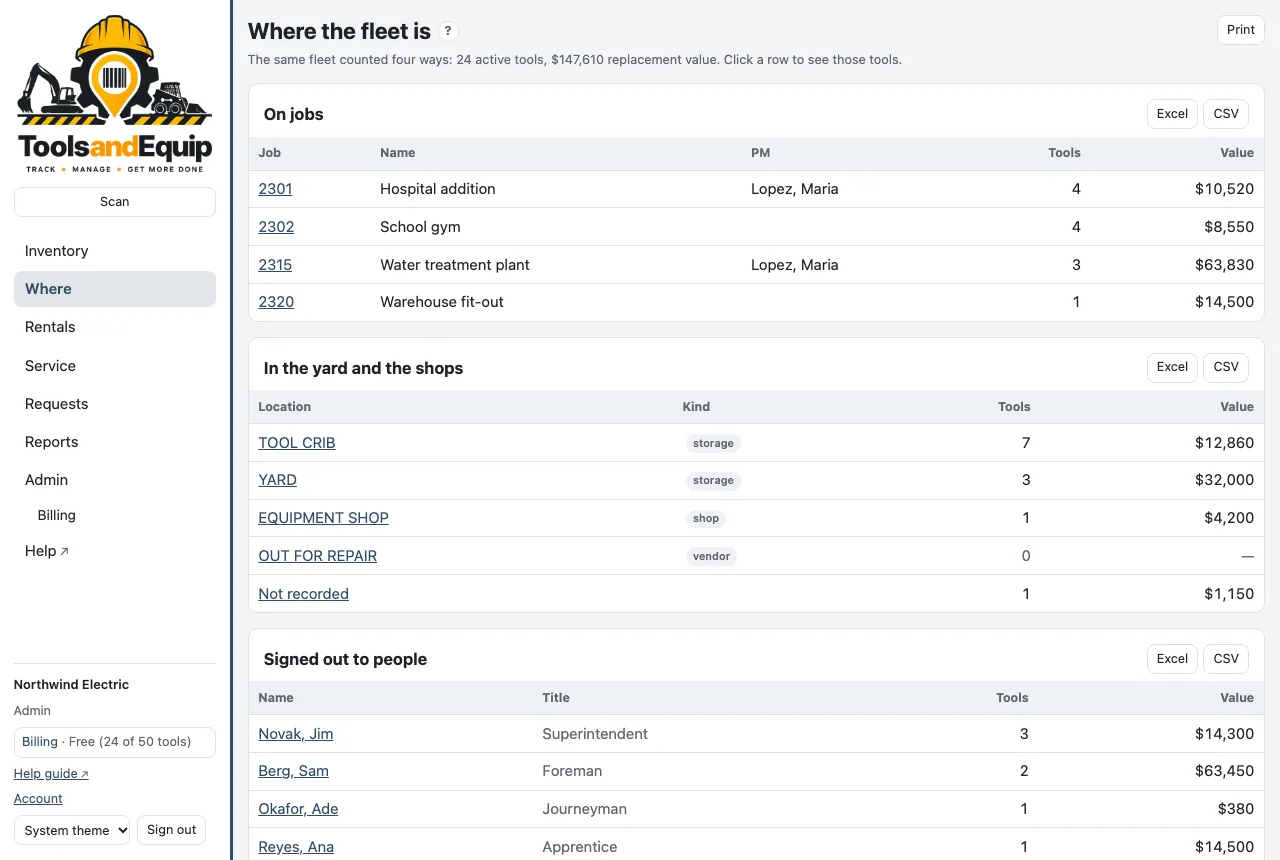
Where counts the same fleet four ways, with the replacement value: On jobs, In the yard and the shops, Signed out to people and By category. Click any row to see those tools in the inventory. Retired tools aren't counted.
Cost to jobs
Who can do this Seeing the report: Admin, Crib and PM (a PM sees their own jobs). Setting charge rates: Admin (Set charge rates).
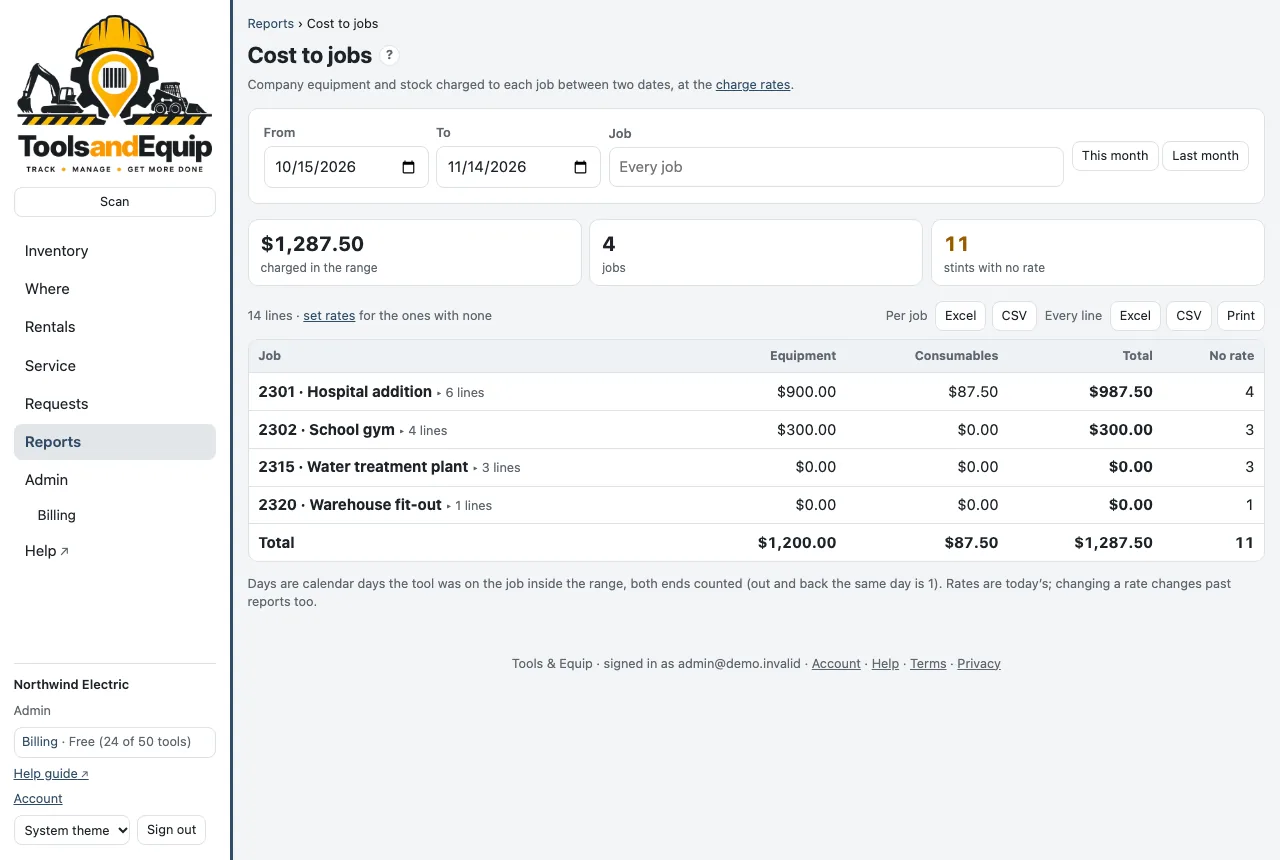
Job charge-back: what each job is charged for company equipment and stock between two dates.
- First set the rates: Admin → Charge rates. For each category enter a daily, weekly and/or monthly rate. A tool can have its own rate too. The cheapest of the rates set applies: 10 days at $25/day or $100/week is 2 weeks, $200.
- Open Reports → Cost to jobs. Pick From and To, or press This month / Last month, and optionally one Job.
- Click a job to see its lines. Export Per job for billing, or Every line for the detail.
Days are calendar days on the job inside the range, both ends counted (out and back the same day is 1). Rates are today's: changing a rate changes past reports too. "Stints with no rate" shows what isn't being charged yet.
Activity
Who can do this The tool ledger: everyone. The audit log: Admin (Audit log).
Reports → Activity lists every move, status change, service and edit across the fleet between two dates, newest first. Filter by Kind or search for a tool, place, person or note. The screen shows the first 500 lines; the export has them all.
With Receivers accept transfers, a movement that was accepted shows how under it (Accepted by Fred on their device, Accepted in person (signed), Accepted in person (no signature), Confirmed for someone). Filter by Accepted, and the export adds the columns Acceptance, Accepted by, Accepted at, Sent by and Device. Declined and canceled transfers never moved anything, so they are under Transfers → History, with their own export.
The Audit log tab shows who did what: admin changes and imports.
Exports
- Excel files have a frozen header row with filters, real dates and dollar amounts, and a totals row. They print landscape, fit to width.
- CSV files have the same columns, for other software.
- The inventory's Export gives exactly what is on screen with the replacement cost totaled. It's the file for insurance and the auditors.
- Your import lists (tools, people, jobs, locations, categories) export from Import → Export current.
Office
15 · Admin: people, members and roles
People versus members, inviting, roles and rights, custom roles, your company look, and the jobs, locations and categories lists (with calendar colors).
People and members: what's the difference
- People (Admin → People) are everyone who can hold a tool: employees, foremen, subcontractors. Most of them never sign in.
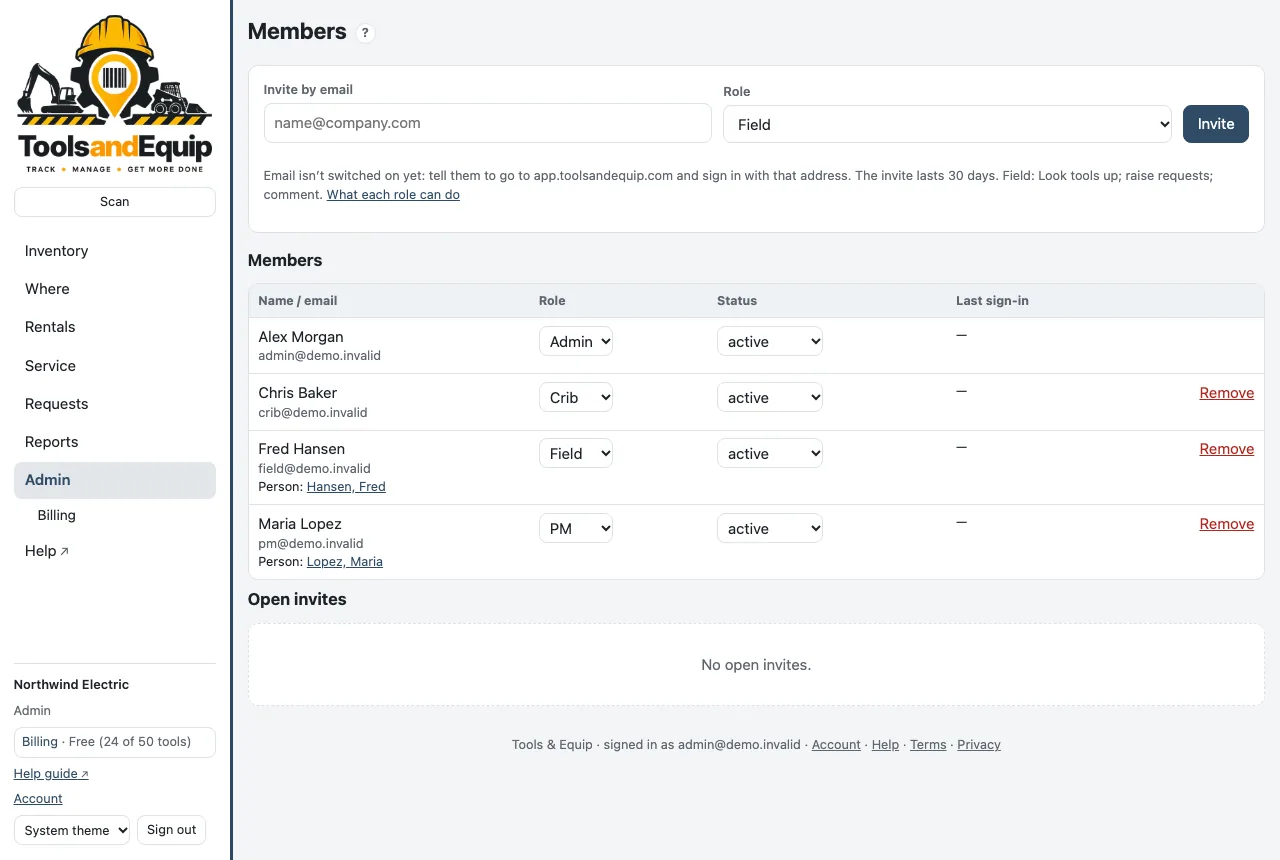
- Members (Admin → Members) are the people who sign in, each with a role.
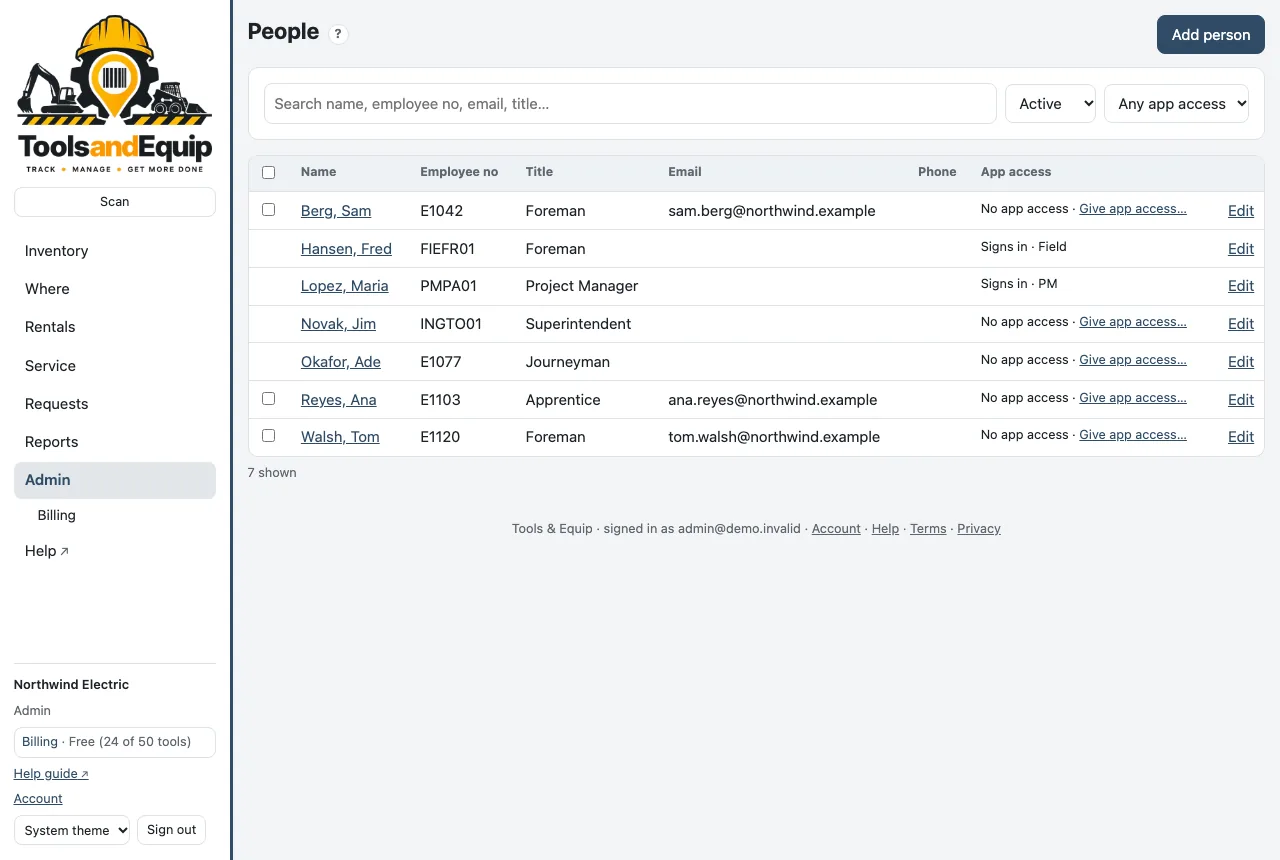
A member can be linked to a person. The People list shows each person's App access: Signs in · role, Invite sent, or No app access.
Add or edit a person
Who can do this Admin and Crib (People). The "Can sign in" box: Admin (Members).
- On People, press Add person (or Edit on a row).
- Fill in the Name and anything else: preferred name, employee number, email, phone, title, occupation. Tick Field lead for a foreman who holds tools for a crew. Choose a Calendar color if you want their bookings to stand out on the calendar.
- To let them sign in, tick Can sign in to Tools & Equip and pick a role. They need an email. On Save they are invited by email.
Someone left? Open them and press Deactivate. Tools in their name become Unassigned so you can find them.
Invite many people at once
Who can do this Admin (Members).
- On People, set the app access filter to No app access.
- Tick the people to invite (the box in the header ticks everyone shown who is active and has an email).
- Pick the Role in the bar and press Give app access to N people. Confirm.
Each person gets an invite email. One email address is one login: if two people share an address, the second is left out and named.
Members and invites
Who can do this Admin (Members).
- Invite: type the email under Invite by email, pick a role, press Invite. The invite lasts 30 days.
- Change a role: pick a new one in the Role column. It saves at once.
- Suspend: set Status to suspended. They can't sign in until you set it back.
- Remove: they no longer see the company. What they recorded stays.
- Open invites: Resend invite (renews it for 30 days; up to 3 emails per address a day) or Withdraw.
Roles and rights
Who can do this Admin (Roles).
Admin → Roles shows a grid: the rights down the side, the roles across the top. A tick saves straight away, with Undo in the message. The Admin role is locked: it always has every right.
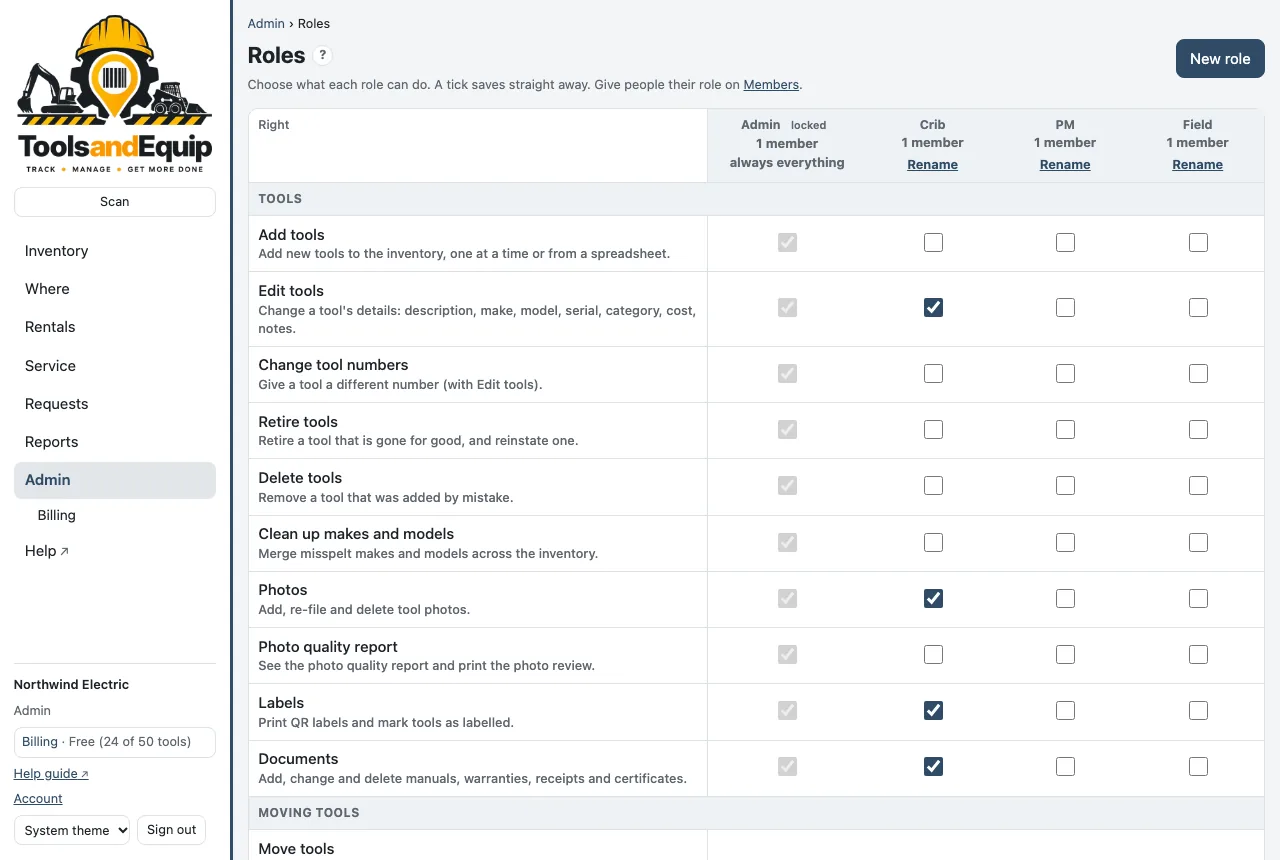
The built-in roles start like this (✓ = has the right):
| Right | Admin | Crib | PM | Field |
|---|---|---|---|---|
| Look up the whole fleet, raise requests, comment | ✓ | ✓ | ✓ | ✓ |
| Book tools, add rentals | ✓ | ✓ | ✓ | – |
| Own jobs (PM): their jobs' requests, rentals and cost | ✓ | – | ✓ | – |
| Move tools (check out/in, repair, missing, signatures) | ✓ | ✓ | – | – |
| Edit tools, photos, labels, documents | ✓ | ✓ | – | – |
| Kits, audits, manage bookings | ✓ | ✓ | – | – |
| Record service, service plans, work orders | ✓ | ✓ | – | – |
| Work requests, manage all rentals | ✓ | ✓ | – | – |
| Issue, receive, count and manage consumables | ✓ | ✓ | – | – |
| Jobs and People lists (and their imports) | ✓ | ✓ | – | – |
| Cost to jobs report | ✓ | ✓ | – | – |
| Add, renumber, retire and delete tools | ✓ | – | – | – |
| Locations and Categories lists | ✓ | – | – | – |
| Set charge rates | ✓ | – | – | – |
| Clean up makes and models, photo quality, merge people, delete any comment | ✓ | – | – | – |
| Members, Roles, Company look, Billing, Audit log | ✓ | – | – | – |
| Pending transfers, Confirm for someone (receivers accept transfers) | ✓ | – | – | – |
The Roles page explains each right in a line. Your company may have changed these, so the grid there is the final word.
Custom roles
- Press New role. Give it a name, like "Foreman", "Shop lead" or "Office".
- Start from Nothing ticked or A copy of another role, and press Make the role.
- Tick what it may do. Then give people the role on Members.
Rename, Reset (built-in roles back to how they started) and Delete (custom roles; its members move to a role you pick) sit under each role. You can only tick rights you have yourself, only an admin can make someone an admin, and a company always keeps at least one admin.
Features
Who can do this Admin (Features). Everyone sees what is on: the menus follow it.
Admin → Settings → Features turns the optional parts of Tools & Equip on and off for your whole company. Not everyone wants to see everything: if your crew never books tools ahead, turn off the Calendar; if requests go by phone call, turn off Requests.
- Included parts, on unless you turn them off: Calendar (bookings), Requests, Rentals, Kits, Consumables, Audits, Work orders, Documents and Charge-back (cost to jobs).
- Insurance and proof of ownership, off until you turn them on: Purchases & receipts, Insurance claims and the Proof of ownership report.
A part that is off disappears everywhere: the menu, the Reports and Admin pages, the tool page, the inventory's buttons (for example Reserve… and Add to a request…), the warning before moving a booked tool, its emails, and the phone app. A link to it says "This feature is turned off — an admin can turn it on in Settings → Features." Nothing is deleted: turn it back on and every booking, request or record is there again.
The inventory, moving tools, Service & inspection, labels and scanning are always on. Receivers accept transfers keeps its own setting below.
The new parts come with their own rights in Roles: Purchases and receipts, See insurance claims, Insurance claims and Proof of ownership report. Only the built-in Admin role has them at first; tick them for Crib or PM if they should have them.
Receivers accept transfers (company setting)
Who can do this Admin (Pending transfers). Everyone can see whether it is on.
Admin → Settings → Receivers accept transfers. Off by default: everything moves at once, as always. Tick it and a tool checked out or handed to a person waits until that person accepts it (see Moving tools). Some companies want that proof, some don't: it's your choice.
- Also for request pickups: closing a filled request waits until the requester accepts the pickup (Requests).
- Allow "Confirm for someone": lets people with that right record a receiver with no phone or login took the tools, with a note. Off: only the receiver's own device or accepting in person counts.
- Ask for a signature when accepting in person: off by default. Off: Accept now shows the receiver's name and an Accept button, recorded as Accepted in person on {name}'s device (no signature). On: the receiver signs on the giver's screen. Receivers who accept on their own device never sign either way.
- Remind the receiver: after 4, 8 or 24 hours, 2 or 3 days, or never.
Two rights go with it in Roles (under Moving tools): Pending transfers (this setting, every waiting transfer, cancel and resend) and Confirm for someone. The built-in Admin role has both; tick them for Crib if your crib should have them. Turning the setting off doesn't touch transfers already waiting: they can still be accepted or canceled.
Company look
Who can do this Admin (Company look).
Admin → Company look puts your logo and colors on the website and in the phone app, for everyone in your company.
- Upload your Logo: PNG, JPEG or WebP up to 2 MB, at least 600 px wide; a transparent PNG looks best. Optional: a Logo for dark backgrounds and a Square icon.
- Set the Name shown, a Short name, the Main color (buttons, links) and the Accent color. The preview shows light and dark, with a contrast check.
- Press Save. The app shows it the next time it opens. Use the built-in look undoes it.
Jobs, locations and categories
Who can do this Jobs: Admin and Crib (Jobs). Locations and Categories: Admin. Everyone can look at the lists.
- Jobs: Add job with a number (leave blank if it has none yet), name, PM, city, state and status. Close a job when it's finished; closed jobs aren't offered for check-outs. Click a job number to see the tools on it.
- Colors: a job or a person can have a Calendar color (on its form, or click the color dot at the start of its row). It colors their bookings on the calendar when it is colored by job or person (see Reservations). Who can set it: whoever has the Jobs right (for jobs) or the People right (for people). In test mode the color is the one thing you can change on a real job or person.
- Locations: Add location with a name and a kind: storage (yard, crib, trailer), shop (your repair shop), vendor (outside repair or rental) or other. Lower sort numbers show first. Untick Active to hide an old place.
- Categories: Add category with a code (1 to 4 letters or digits, like 45) and a name, plus service and inspection intervals that every tool in it inherits.
All of these can come in from a spreadsheet: see Imports.
Office
16 · Imports
Bring in your tools, people, jobs, locations and categories from Excel or CSV, check every row first, and undo for 30 days.
Templates
Each list has a template. The Excel one has a sheet to fill in (with dropdowns), an Examples sheet that is never imported, and a Read me sheet explaining every column. The CSV has just the header row.
| List | Download | Columns (* = required) |
|---|---|---|
| Categories | Excel · CSV | Code*, Name*, Active, Service every (days), Service every (meter), Inspect every (days) |
| Locations | Excel · CSV | Name*, Kind, Sort order, Active |
| People | Excel · CSV | Employee no, Name*, Preferred name, Email, Phone, Title, Occupation, Field lead, Active |
| Jobs | Excel · CSV | Job number, Job name*, PM, City, State, Status, Notes |
| Tools | Excel · CSV | Tool number*, Category code*, Description*, Type, Make, Model, Model year, Serial number, Barcode, VIN, License plate, Plate state, Replacement cost, Meter, Quantity, Location, Notes, Status, Purchase date, Category name |
You can also download them in the app on each tab of Admin → Import (Download template (Excel)). Those copies have dropdowns of your own categories and locations.
Keep the header row exactly as it is. The column order can change; the names can't. A blank cell means "no value" for a new record and "keep what is there" for an existing one.
Which order
- Categories and Locations (or let the tools import add the missing ones).
- People, so each job can find its PM.
- Jobs.
- Tools.
Who can do this Categories, Locations and Tools: Admin. People and Jobs: Admin and Crib.
Import a file
- Open Admin → Import and pick the tab: Categories, Locations, People, Jobs or Tools.
- Under 2. Upload and check, choose your .xlsx or .csv file. (An old .xls? Open it in Excel and save it as .xlsx.)
- Choose Add new and update existing or Add new only (skip existing).
- Tools only: tick Add missing categories and locations if your file names some that aren't in yet.
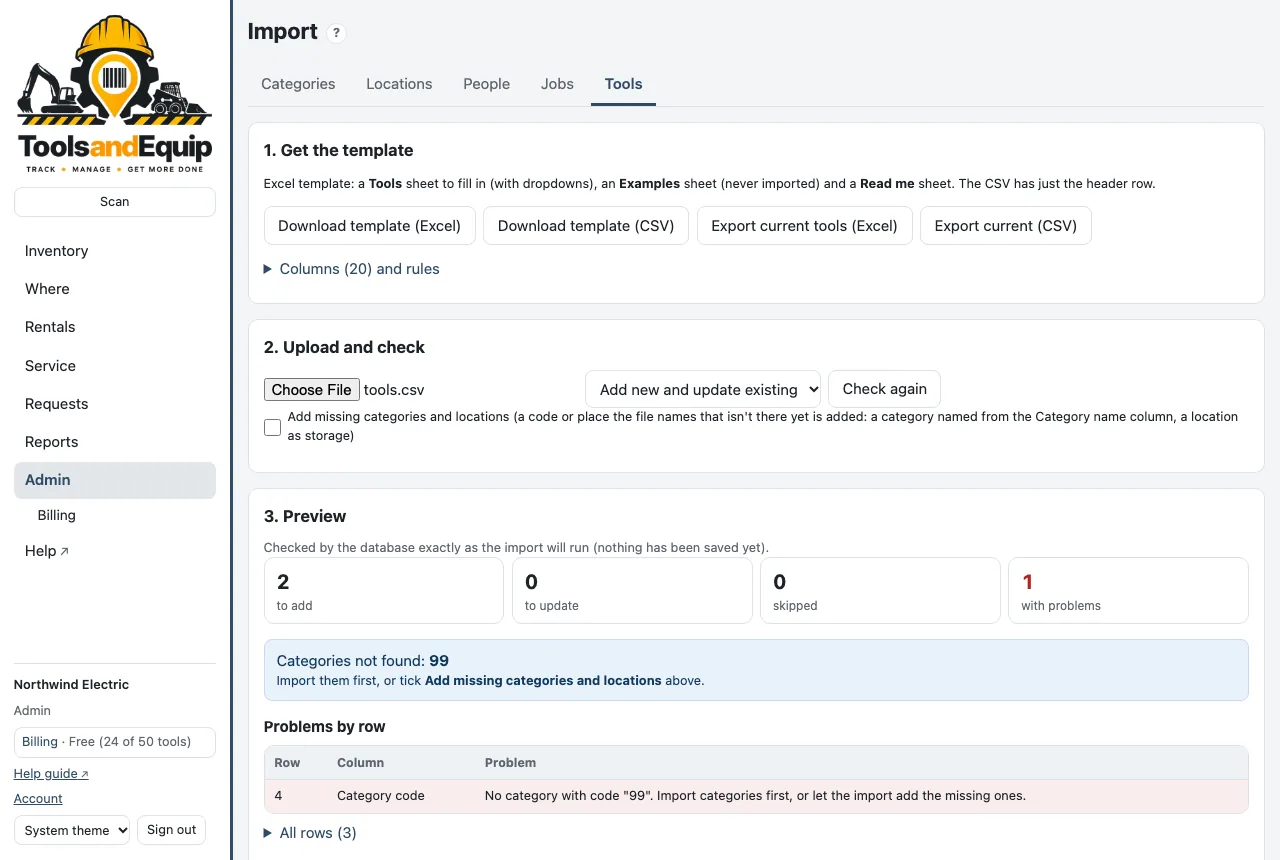
- Read the 3. Preview. Nothing has been saved yet. It shows how many rows will be added, updated, left unchanged or skipped, and lists every problem by row and column.
- Fix problems in your file and upload it again, or press Import N rows to bring in the good rows and leave out the rest.
How rows are matched
- Categories by code; Locations by name (capitals don't matter).
- People by employee number, else the exact name.
- Jobs by job number. A job with no number is always added as new.
- Tools by tool number. For a tool that already exists only the descriptive columns are updated. Location and Status only apply to new tools: moves are made in the app, not by import.
Nothing is ever deleted by an import. A person marked Active = no is deactivated and their tools become unassigned. Over your plan's tool limit after the grace period, the preview says how many new tools would be refused.
Undo an import
Every import is listed under Import history. For 30 days you can press Undo…: what it added is removed and what it changed is put back. Anything that has been used or changed since the import is kept as it is, and the dry run shows you what is kept and why before you press Undo N now.
Get your lists out
Each tab has Export current … (Excel) and Export current (CSV): your current list in the same columns as the template. Handy for a big clean-up: export, fix in Excel, import back.
Office
17 · Notifications
Choose what Tools & Equip tells you about, by email and push, and see what was sent.
Choose your notifications
Who can do this Everyone, for themselves. Nobody else's settings change.
Open Admin (or Lists) → Notifications. In the phone app: Settings → Notifications…. Tick Email and Push for each kind. You only see the kinds that can reach your role.
| Kind | When | Who gets it |
|---|---|---|
| New requests | Someone raises a request. | Admin, Crib (Work requests) |
| My requests | A request you raised changes status. | Everyone |
| Work orders for me | A work order is assigned to you. | Everyone |
| New work orders | A work order is opened with nobody assigned. | Work orders |
| My work orders' progress | A work order you opened (or your request's) is started, waiting for parts, done or canceled; or one assigned to you is canceled. | Everyone |
| Overdue work orders | Daily: a work order assigned to you is past its due date (or one you opened, when a vendor or someone without a login has it). | Everyone |
| Overdue returns | Daily: bookings and rentals past their end date with tools still out. | Bookings or rentals rights, PMs for their jobs. Email |
| Service due | Daily: services and inspections overdue or due within 7 days, work orders past due. | Record service. Email |
| Documents expiring | Daily: documents expired or expiring within 30 days. | Documents. Email |
| Tools to accept | Someone hands you tools, or your request was picked up, and your company has Receivers accept transfers on. Reminders too. | Everyone |
| My transfers | Someone declined tools you sent, a transfer of yours was called off by someone else's move, or an admin confirmed for you that you took tools. | Everyone |
| Billing | The plan's grace period starts, and when it's about to end. | Admin (Billing). Email only |
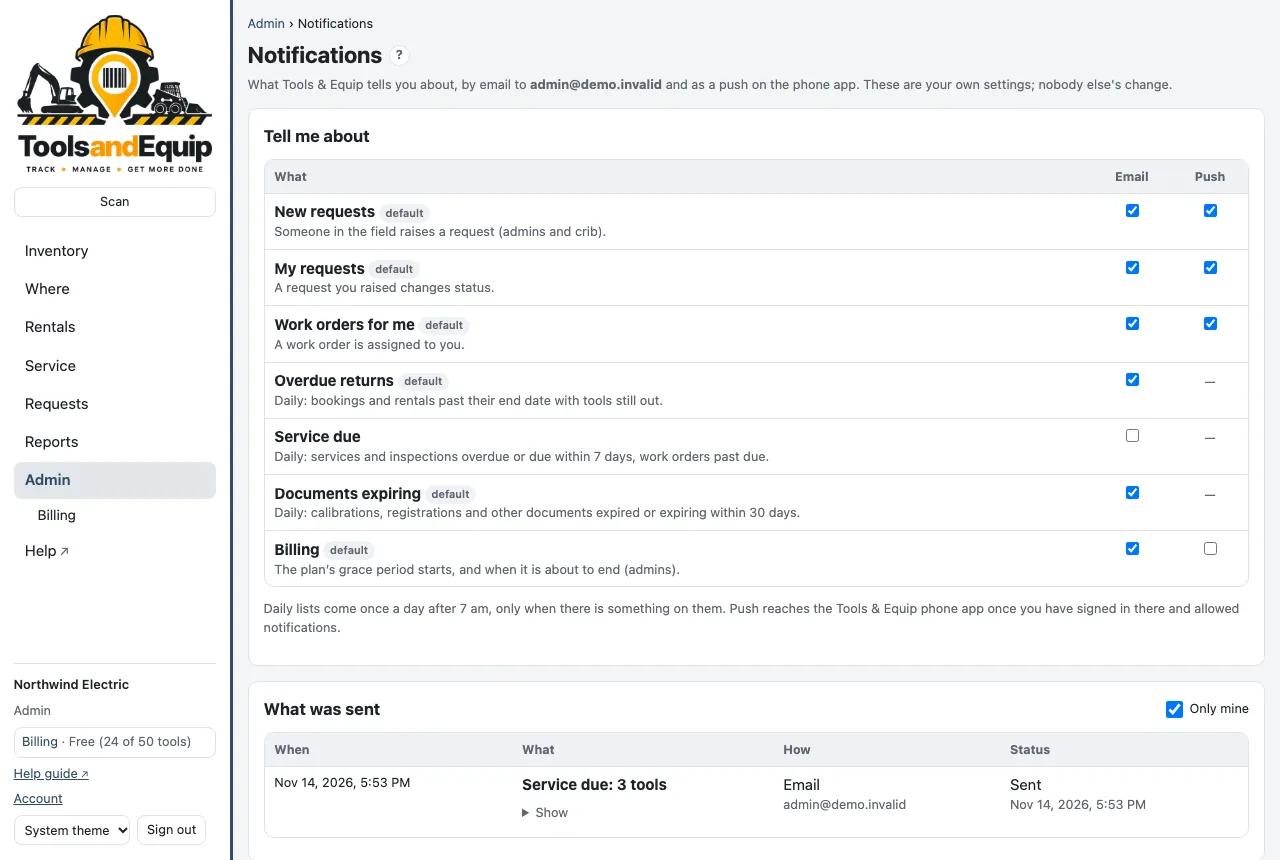
- Daily lists come once a day after 7 am (your company's time zone), and only when there is something on them.
- Push reaches the Tools & Equip phone app once you have signed in there and allowed notifications. In the app, Turn on push here or Open iOS Settings.
- What was sent lists your recent emails and pushes and whether they went out.
- Invite emails and sign-in codes always go out. They aren't a setting.
Office
18 · Plans and billing
Free up to 50 active tools, priced by active tools above that, unlimited users. Managed by an admin on the website.
How plans work
- Free for up to 50 active tools. Above that, the price depends only on how many active tools you track.
- Unlimited users on every plan, free included.
- Only active tools count. Available, out, on a job, in repair and missing all count. Retired tools don't.
- Yearly billing costs 10 months: 2 months free.
- A little room: you can go up to 10% over your plan before anything changes (for example 220 active tools on the Up to 200 plan).
| Active tools | Monthly | Yearly |
|---|---|---|
| Up to 50 | Free | Free |
| Up to 200 | $10 | $100 |
| Up to 500 | $25 | $250 |
| Up to 1,000 | $50 | $500 |
| Up to 2,000 | $100 | $1,000 |
| Up to 3,000 | $150 | $1,500 |
| Over 3,000 | Email [email protected] | |
Prices are in US dollars. The current prices are always on the pricing page.
Manage the plan
Who can do this Admin (Billing). Plans are managed on the website only, not in the phone app.
- On app.toolsandequip.com, open Billing in the menu (under Admin).
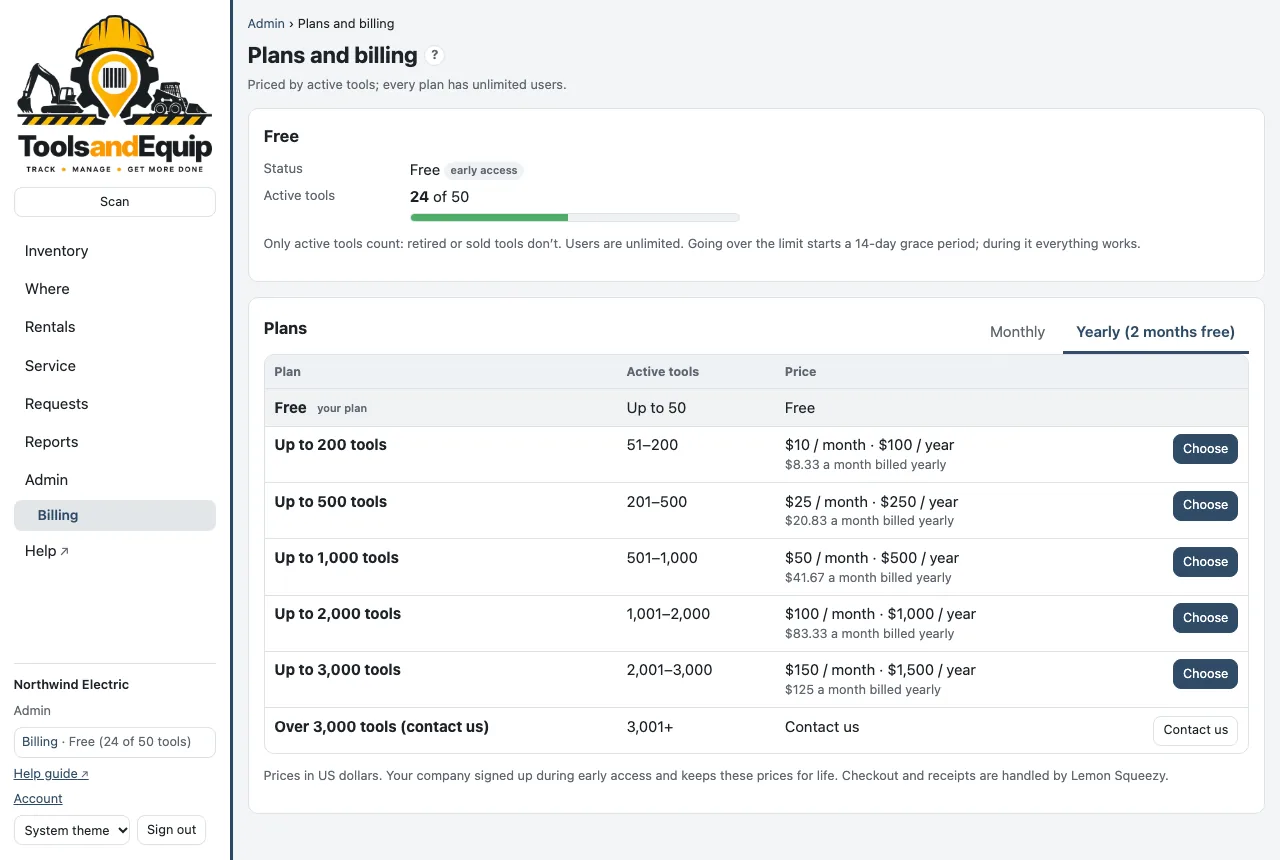
- The plan card shows your plan, its status, Active tools N of … and when it renews.
- Under Plans, pick Monthly or Yearly and choose a plan. Checkout and receipts are handled by Stripe, our reseller: they say “Sold through Link”, and the charge shows on the card statement as LINK.COM* TOOLSANDEQUIP. Sales tax is added on top where it applies. We never see your card number.
- Manage billing (card, invoices, cancel) opens Stripe's billing portal to change the card, download receipts or cancel. The subscription can also be managed at link.com.
A canceled plan runs to the end of the period you paid for, then your company is on the free plan again. Your data stays.
Going over the limit
Nothing stops working and nothing is deleted.
- Going more than 10% over the plan starts a 14-day grace period. Everything works as usual. Admins see a banner with the days left and get a billing email (by email only; billing never comes to the phone app).
- After the grace period, adding or reinstating tools is paused above that 10% until the company is back within a plan, by changing plan or retiring tools you no longer have.
- Moving, checking out, looking up and reporting on the tools you have keeps working throughout.
The phone app never sells or changes plans. If it says the tool limit has been reached, ask a company admin, who manages the plan here on the website.
Office
19 · Account and your data
Delete your account or your company, read the privacy policy, and export your data.
Your account
Open Account at the bottom of the menu. Tools & Equip signs you in with a 6-digit code emailed to your address; there is no password to change.
Delete your account
Who can do this Everyone, for their own account.
- Website: menu → Account → Delete account. App: Settings → Delete account….
- Read the line for each of your companies. It says what happens there.
- Type
DELETEand press Delete my account.
Your sign-in, memberships, notification settings, phone notification tokens and any invites to your address are deleted. It can't be undone. What you recorded in a company (moves, comments, services) stays with the company and shows "Former user".
If you are a company's only admin, make someone else an admin first (Members), or delete the company. If you are its only member, the company has to be deleted first.
Delete your company
Who can do this The company's only admin.
- On Account, press Delete {company}….
- Type the company's name to confirm and press Delete the company.
This removes all of the company's tools, history, people, jobs, photos and documents, for everyone in it. It can't be undone. Any subscription is canceled (no further charges; time already paid is not refunded automatically). Export what you want to keep first.
Export your data
Your data is yours. On every plan, at any time:
- The inventory: Export on the Inventory page (Excel or CSV).
- Every list (tools, people, jobs, locations, categories): Admin → Import → Export current, in the same columns as the import templates.
- History and reports: every table on Reports exports to Excel or CSV, including the full activity ledger.
Privacy
How we handle your data is in the Privacy Policy, and the rules of the service are in the Terms of Service. Questions: [email protected].
Phone and fixes
20 · The phone app
Tools & Equip for iPhone and iPad: scan, move, Scan out / in, audits and stock, even with no signal.
Get the app
Tools & Equip runs on iPhone and iPad, in portrait and landscape. Get the free Tools & Equip app on the App Store (search for Tools & Equip); it needs iOS or iPadOS 16.4 or later. Android is coming. Until then, Android phones can use the website: app.toolsandequip.com works in Chrome, camera scanning included.
Sign in with your work email and the 6-digit code, the same as the website. Your company must have invited your email first.
What's in the menu
Tap ☰ (on an iPad in landscape the menu sits on the left). You see what your role can use:
- Inventory: search or scan, filter by category, location, job, holder, status and type. Tap the badges (Available, Out, In repair…) to filter.
- Scan out / in: scan a whole truckload and move it at once (Admin and Crib). See Scan out / Scan in.
- Waiting to send: shows only when moves are waiting for a signal.
- Audit by scan, Consumables, Location, Service & inspection, Requests, Rentals, and Bookings: what is booked from today to 60 days ahead, soonest first (the calendar with clashes is on the website). Tap a booking of a tool to open the tool.
- Settings: your company, which features are on, Notifications…, Sign out, Delete account…, and Help, which opens this guide.
Admin work (tool numbers, new categories, locations, people, imports, roles and billing) stays on the website.
Your company's Features. The app follows Settings → Features on the website: a part your company turned off (for example Bookings or Requests) is not in the menu or on the tool page, and a link to it says it is turned off. When Purchases & receipts is on, a tool shows its Purchase card (see On the phone); when Insurance claims is on, people who may see claims get the claims a tool is on (filing and changing claims is on the website). The app checks the switches each time it starts and remembers them with no signal.
Scan a tag
- Tap the camera button by the search box.
- Point the camera at the tag's barcode or QR label. It closes on the first code it reads.
- The tool opens. No match? Admins can add a tool with that barcode.
You can also type the number, or use a Bluetooth "wedge" scanner in the search box. Scanning a Tools & Equip label with the iPhone camera app opens the tool too.
A tool in the app
Each tool shows where it is, the PM, who has it and when it last moved, with photos, details, history, service and comments. Depending on your role you get Move…, Check in, Send to repair, Mark missing, Record service…, Add photo… and Edit tool…. Everyone gets Request this… and Comment.
Bookings on a tool. A tool booked in the next 60 days says so under where it is, for example Booked Nov 20–24 for Main St Clinic (Fred) · confirmed. People who can book tools tap Reserve… on its Bookings card (to reserve several tools at once, use the website). If you tap Move… or Send to repair while it has a booking that has started or starts in the next 3 days for another job or person, the app says so first and you choose Move anyway or Cancel. Bookings need a signal: with none, the tool shows no bookings and gives no warning.
Tools to accept
Filling requests on the phone (crib). On a tool, or on the Scan tray, tap Add to a request… to put the tools on someone's request without moving them (Fill a request with a pick list). On the request itself, Add tools scans label after label or searches, and the ✕ next to a tool takes it off. Filled — say where checks the list out to the requester. Adding and taking off need a signal; they are not saved for later like moves.
If your company has Receivers accept transfers on, tools handed to you show at the top of the Inventory as To accept (and a push arrives). Tap it, check the tools, and tap Accept or Decline. With no signal it's kept and sent later. If you hand tools over yourself, Transfers in the menu lists what is waiting, with Accept now for a receiver standing next to you (Accept now (sign) if your company asks for a signature).
No signal
The app keeps a copy of the fleet on the phone. Scans, moves (with signatures), stock issues and audit scans are saved and sent by themselves when the signal is back. See No signal? Keep scanning.
Phone and fixes
21 · Troubleshooting and FAQ
The code didn't come, the camera won't open, you can't move a tool, a label won't scan, and other common questions.
I didn't get the sign-in code
- Check your junk or spam folder for mail from [email protected].
- Check the email address on the screen. Wrong? Use another email.
- Wait a minute, then Send a new code. Use the newest code: each one works once, for 15 minutes.
- Company mail filters sometimes hold new senders. Ask your IT person to allow [email protected].
- "That code didn't work"? It was mistyped, used already or older than 15 minutes. Ask for a new one.
"No company yet" or "isn't in any company"
Your email hasn't been invited. Ask your equipment admin to invite the exact address you sign in with (Admin → Members), then sign in again. Or create your own company.
The camera won't open
- iPhone/iPad app: tap Allow camera. If you said no before, tap Open Settings and turn on Camera for Tools & Equip.
- Website on iPhone (Safari): tap the aA button → Website Settings → Camera → Allow. Or Settings → Apps → Safari → Camera.
- Website on Android (Chrome): tap the site settings icon next to the address and allow the camera.
- On a computer: allow the camera for app.toolsandequip.com in the browser's address bar. "The camera is busy" means another app (a video call) is using it.
- The Scan button only shows on devices that have a camera. You can always type the code instead.
Working offline
The phone app keeps working with no signal: scans look tools up in a copy on the phone, and moves wait in Waiting to send until the signal is back. The website needs a connection. If a move says "moved by someone else since", choose Keep theirs or Apply mine (see how). Don't sign out while changes are waiting.
I can't move a tool
- No move buttons: your role doesn't include Move tools (by default only Admin and Crib have it). Raise a request instead, or ask an admin about your role.
- The tool is retired: an admin has to bring it back into service first.
- A "Test mode" banner: your company is trying Tools & Equip beside its old system. Tools marked real · read only can't be changed yet; only test tools numbered ZZ- can.
- "Choose a job, a person, or both": a check-out needs at least one. A check-in needs a location.
A label won't scan
- Hold the phone steady, about a hand's width away, in good light. Wipe the label.
- Labels printed with "Fit to page" come out too small. Reprint at 100% / Actual size, and check the test page ruler (see Labels).
- Scratched or oily? Reprint it on Avery 5520 weatherproof film.
- "Label not found" or "belongs to a company you are not a member of": you are signed in with a different email or company. Switch company in the menu, or sign in with the email that company invited.
- "No tool with this code": the barcode isn't on any tool yet. Type it into the tool's Barcode field (or admins: Add a tool with this barcode).
I can't add a tool
Adding tools needs the Add tools right (Admin by default). If Add tool is grayed out for an admin, the company is over its plan's tool limit and the grace period has ended. See Going over the limit.
Other questions
Do the people holding tools need to sign in?
No. Anyone on the People list can hold tools. Only people who look things up or move things need a login, and every plan has unlimited users.
Can I change a tool's number?
Yes, with the Change tool numbers right (Admin). Edit the tool. Labels printed with the old number stop working, so print a new label.
Light or dark?
Pick System, Light or Dark at the bottom of the menu on the website. The phone app follows your phone's setting.
Where do I get help?
Email [email protected]. Say what you were doing, what you expected and what happened, with a screenshot if you can, plus your company name and the email you sign in with. Never send your sign-in code.
More features
22 · Purchases & receipts
Record what each tool cost, where and when it was bought, its warranty and the receipt, for your records and your insurer.
Purchases & receipts is off until an admin turns it on in Settings → Features. Once it is on, every tool page has a Purchase card and the inventory export gets the purchase columns.
Record a purchase for one tool
Who can do this Everyone can see a tool's purchase and open its receipt. Recording and changing: Admin, or anyone given Purchases and receipts in Roles.
- Open the tool and, in Purchase, press Record purchase….
- Fill in what you know: Bought from, Purchase date, PO / invoice #, Warranty ends, the Price and any notes.
- Add the Receipt: a PDF or a photo of it (JPEG, PNG or WebP), up to 25 MB. On a phone or tablet the camera opens.
- Press Record purchase.
The card then shows the vendor, date, price, PO, the warranty ("Warranty ends Dec 15, 2026 (in 29 days)") and Open the receipt. Edit changes any of it, replaces or removes the receipt, or deletes the purchase (the tool stays).
One receipt for several tools
Bought five drills on one invoice? Record it once:
- In the Inventory, press Select tools and tick the tools.
- Press Record purchase… in the bar at the bottom.
- Fill in the vendor, date, PO and warranty once. Type each tool's price, or type the invoice total and press Split evenly.
- If one tool has a different warranty, give it its Own warranty end.
- Attach the receipt and press Record purchase.
Each of those tools shows the purchase, and "Same purchase: 4 other tools" links to the whole invoice. A tool can be on one purchase only: if one of them already has a purchase, you are asked whether to move it to this one.
Warranty reminders
Before a warranty ends, Tools & Equip emails the people with Purchases and receipts, once per purchase. How many days ahead is set in Settings → Features, beside Purchases & receipts: 7, 14, 30 (the default), 60 or 90 days, or no reminders. Each person can turn the email off in Notifications (Warranties ending).
Purchases and warranties
Reports → Purchases and warranties lists every purchase, newest first, with its tools, total, warranty and receipt. Search by vendor, PO or tool; export to Excel or CSV, or print. Warranties ending soon are marked.
In the inventory export
With Purchases & receipts on, Export in the Inventory adds Bought from, Purchase date, Purchase price (totaled), PO / invoice #, Warranty ends and Receipt (yes when one is attached) to the end of every row. That file and the Proof of ownership report are what your insurer asks for.
On the phone
The phone app shows a tool's purchase on its Purchase card: where and when it was bought, the price, the PO or invoice number, the warranty and Open the receipt. People with Purchases and receipts tap Add receipt… (or Replace receipt…), then take or choose a photo of the receipt: it is added to that tool's purchase, or starts one for the tool that you fill in on the website. It needs a signal.
More features
23 · Insurance claims
File a claim for stolen, damaged or lost tools, keep the papers together, send the claim packet, and see what the insurer paid.
Insurance claims is off until an admin turns it on in Settings → Features. Then Claims shows under Reports in the menu.
File a claim
Who can do this Admin, or anyone given Insurance claims in Roles. See insurance claims lets someone (a PM, the office) read them without changing anything.
- Open Claims and press New claim. Or, in the Inventory, select the tools and press File a claim…; or on a tool page, File an insurance claim….
- Choose What happened (Stolen, Damaged, Lost or Other) and the Date of loss.
- Add the job or the place, the Police report #, the Insurer, the Policy # and, once you have it, the Insurer's claim #. Say what happened in a few words.
- Press File the claim. It gets the next claim number and opens.
The tools on a claim
- On the claim, press Add tools….
- Type a tool number or name, or press Scan and scan the labels one after another.
- Each tool's value is its replacement cost unless you type another amount.
- Leave Mark them missing ticked (for a damaged claim: Send them for repair) so the inventory shows it too. It needs Move tools; a tool that can't be marked is listed with the reason, and the rest still are.
- Press Add to the claim. The total value claimed is shown.
Papers and photos
Under Papers and photos, add the police report, the insurer's letters, estimates or quotes, and photos of the damage or the scene: PDF or a picture, up to 25 MB each. Everyone who can see claims can open them.
The claim packet
Claim packet (PDF) builds one PDF for the insurer: your logo, the claim's details, a table of the tools (number, description, make, model and serial, value; with Purchases & receipts on, also when and where each was bought and the price), the totals, the list of papers, the photos, the tools' photos and the receipt pictures. Receipts kept as PDF files are listed by name.
Email claim packet… sends it to the address you type (your agent or the adjuster, up to five). It comes from [email protected] with replies going to you, the PDF attached (or a link when it is over 10 MB), and the claim's history records who it went to. Until email is set up for your company, the claim says Email: download the PDF and attach it: download the packet and attach it to your own email.
Status and payment
A claim is Filed, then Under review, then Paid, Denied or Withdrawn. Record payment asks for the amount paid, the deductible and the date. A closed claim can be Reopened (back to Under review). Every step is kept in the claim's History.
After the insurer pays
For each tool on a paid claim, choose what became of it:
- Replace: the tool is retired and, if the new one is already in the inventory, linked to it.
- Retire: the tool is retired (gone for good).
- Found: it turned up; it is checked back in to the location you choose. Found works before payment too.
Retired tools keep their whole history, and the tool page lists the claims it was on. A claim filed by mistake can be deleted until one of its tools is settled; after that, withdraw it instead.
The claims report
The top of Claims shows, per year of the loss, how many claims and tools, the value lost, what was paid, the deductibles, what was not recovered and how many are still open. Withdrawn claims are left out. Export it to Excel or CSV, or print it.
Proof of ownership report
Who can do this Admin, or anyone given Proof of ownership report in Roles, once an admin turns the report on in Settings → Features.
A PDF your insurer can keep on file, before anything goes missing: your logo and the date, every tool with its photo, serial number and value, the totals, and with Purchases & receipts on, the purchases and receipt pictures.
- The whole fleet: Reports → Proof of ownership (insurance) → PDF.
- What the inventory shows: filter it (a category, a place, a job), then press Proof of ownership beside Export.
- Some tools: Select tools, tick them, then Proof of ownership in the bar.
A big fleet gets photos for its first 300 tools; the table always has every tool.